 Mitsubishi Outlander: Digital clock*
Automatic mode and manual mode is available for digital clock adjustment:

Select the automatic mode or the manual mode by performing the following operations: 1. Press the PWR switch (A) to turn ON the audio system. 2. Enter the function setup mode by pressing the TUNE switch (B) for 2 seconds or longer.
3. Press the TUNE switch (B) repeatedly to select the CT (Clock Time) mode. The order is: AF → CT → REG → TP-S → Language of PTY display → SCV → PHONE → Function setup mode OFF (refer to “Function setup mode” on page 5-29, 5-52).
NOTE:
● Although “PHONE” appear on the display, the PHONE function is inoperative.
4. Turn the TUNE switch (B) left and right and select either ON or OFF.
CT ON- Automatic mode. CT OFF- Manual mode.
NOTE:
● After selecting a mode, you can leave the function setup mode by taking either
of the following steps: • Press the TUNE switch (B) for at least 2 seconds. • Make
no entry for 10 seconds.
Automatic mode
The automatic mode can set the local time automatically by using the signal from the local RDS stations. In this mode, CT (A) is shown in the display. Refer to “Radio data system (RDS)” on page 5-23, 5-46.
Manual mode
The manual mode is also available in case the “Automatic mode” shows the incorrect time when the adjacent local RDS stations are located in a different time zone. Refer to “Radio data system (RDS)” on page 5-23, 5-46.
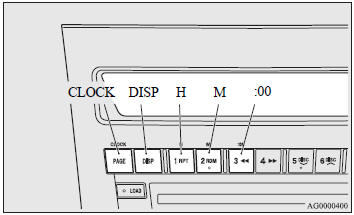
Set the time by pressing the various buttons as described below. 1. Keep the CLOCK button pressed until the time display flashes. 2. Press the appropriate buttons to adjust the time. 3. Once the time is set, press the “DISP” button, and the time display will stop flashing. When a time adjustment has been made, the flashing stops automatically.
NOTE:
● If the battery cables are disconnected during repairs or for any other reason,
reset the clock to the correct time after they are reconnected.
● The digital clock does not have a second display. When the “minute” display is
adjusted and reset to zero, the clock begins at zero seconds for the selected minute.
“H” button - To adjust the hour. “M” button - To adjust the minutes. “:00” button
- To reset the minutes to zero. 10:01 - 10:29...... Changes to 10:00. 10:30 - 10:59......
Changes to 11:00.
 Antenna
Roof antenna
To remove
Turn the pole (A) anticlockwise.
To install
Screw the pole (A) clockwise into the base (B) until it is securely retained.
NOTE:
● Be sure to remove the roof anten ...
 Hands-free Bluetooth® cellular phone interface system with voice recognition*
The Hands-free Bluetooth® cellular phone interface system with voice recognition
uses a wireless communication technology known as Bluetooth® to allow you to make
hands-free calls in your vehicl ...
See also:
Important information about this manual
You will see various symbols in this manual. They
are used in the following ways:
This is used to indicate the presence of
a hazard that could cause death or
serious personal injury. To avo ...
Other Information
The Bluetooth® word mark and logos are owned by the Bluetooth® SIG, Inc. and
any use of such marks by General Motors is under license. Other trademarks and trade
names are those of their respect ...
Off-road recovery
If the towing eyes are to be
used for
off-road recovery, it is essential that
off-road driver training covering
recovery techniques is undertaken.
Further information on off-road driver trainin ...