 Dodge Nitro: Bulb replacement
Headlamp
1. Open the hood. 2. Reach behind the headlamp unit in the engine compartment to access the headlamp bulb lock ring. 3. Firmly grasp the lock ring on the back of the headlamp unit housing.
4. Rotate the lock ring on the back of the headlamp housing counterclockwise to unlock it.
CAUTION: Do not touch the new bulb with your fingers. Oil contamination will severely shorten bulb life. If the bulb comes in contact with any oily surface, clean the bulb with rubbing alcohol.
5. Disconnect the electrical connector and replace the bulb.
Left Front Turn Signal
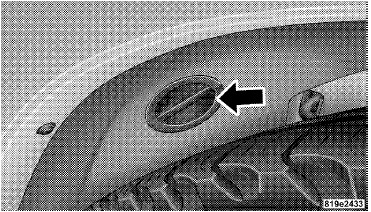
1. Turn the steering wheel all the way to the right (full right lock). 2. Remove the door in the left wheel liner by twisting counter clockwise. Access to the bulb can be gained through the wheel liner hole.
 Access Door
3. Disconnect the electrical connector. 4. Twist the bulb counter clockwise to remove.
Right Front Turn Signal
1. Open the hood. 2. Reach behind the headlight unit in the engine compartment to access the turn signal bulb. 3. Twist the bulb counterclockwise to remove. 4. Disconnect the electrical connector and replace the bulb.
Front Side Marker
1. Open the hood. 2. Remove the grille assembly as follows: a. Remove eight fasteners. b. Remove two screws from each headlamp. c. Remove two rivets from the center of the grille. d. Remove one push pin from the top of each fender. e. Pull the grille assembly toward you to disconnect the grille clips to the fender and the headlamp ballstuds to the front end module. 3. Disconnect electrical connector. 4. Turn the bulb counterclockwise to remove.
Front Fog Lamp (Front Fascia Mounted)
1. Reach between the front fascia and wheel liner from under the vehicle. 2. Turn the front fog lamp bulb one quarter turn counterclockwise to remove from housing. 3. Disconnect the electrical connector and replace bulb.
CAUTION: Do not touch the new bulb with your fingers. Oil contamination will severely shorten bulb life. If the bulb comes in contact with any oily surface, clean the bulb with rubbing alcohol.
Rear Tail, Stop, Turn Signal, and Backup Lamp
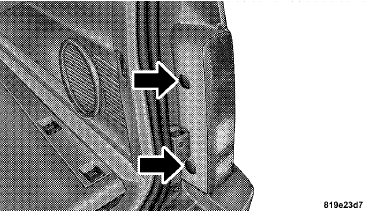
1. Open the lift gate. 2. Remove the two push pins.
 Push Pins
3. Pull lamp straight back and disconnect electrical connection. 4. Remove the two screws attaching the backplate to the lamp assembly.
5. Pull the backplate straight back from the lamp housing. 6. Disconnect the electrical connector. 7. Remove the bulb from the backplate.
Center High Mounted Stop Lamp (CHMSL)
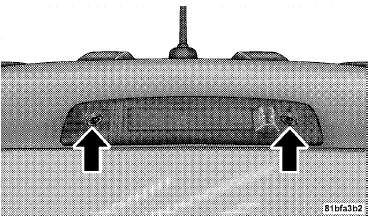
1. Remove the two screws securing the CHMSL.
 Screw Locations
2. Disconnect the electrical connector and washer hose (if equipped) from the CHMSL. 3. Replace the CHMSL.
 Replacement bulbs
LIGHT BULBS – Interior Bulb No.
Dome Lamp. . . . . . . . . . . . . . . . . . . . . . . . . TL212–2.
Liftgate Lamp . . . . . . . . . . . . . . . . . . . . . . . . . . . 567.
Overhead Console ...
 Fluid capacities
FLUID CAPACITIES ...
See also:
Selecting device
1. Select the “SELECT AUDIO” (type C
audio)/“Select Audio Player” (type D
audio) menu. If no devices are registered,
“EMPTY” is displayed and the mode
changes to the Bluetooth® au ...
Service Station Guide
1. Fuel.
2. Engine hood.
3. Tire changing tools.
4. Engine oil dipstick <Yellow>.
5. Automatic transmission fluid dipstick <Red>.
6. Engine coolant.
7. Windshield washer flu ...
Navigation System
If the vehicle has a navigation system, there is a separate navigation system
manual that includes information on the radio, audio players, and navigation system.
The navigation system provides d ...
