 Nissan Rogue: Replacing
Replace the wiper blades if they are worn.
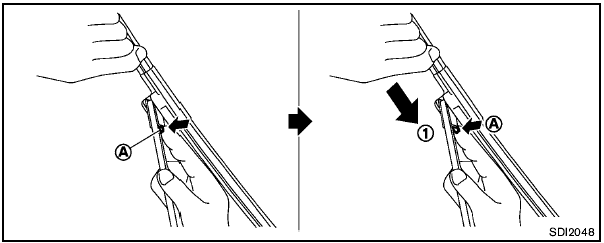
1. Lift the wiper arm away from the windshield.
2. Push and hold the release tab A , and move the wiper blade down the wiper arm 1 .
3. Insert the new wiper blade onto the wiper arm until a click sounds.
4. Rotate the wiper blade so that the dimple is in the groove.

- After wiper blade replacement, return the wiper arm to its original position; otherwise it may be damaged when the hood is opened.
- Make sure the wiper blades contact the glass; otherwise the arm may be damaged from wind pressure.
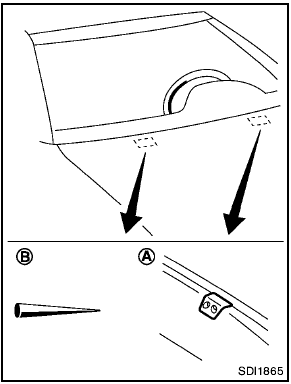
Be careful not to clog the washer nozzle A .
This may cause improper windshield washer operation. If the nozzle is clogged, remove any objects with a needle or small pin B . Be careful not to damage the nozzle.
 Cleaning
If your windshield is not clear after using the
windshield washer or if a wiper blade chatters
when running, wax or other material may be on
the blade or windshield.
Clean the outside of the wi ...
 Rear window wiper blade
Contact a NISSAN dealer if checking or
replacement is required. ...
See also:
Suggestions for obtaining service for your vehicle
Prepare For The Appointment
If you’re having warranty work done, be sure to have the
right papers with you. Take your warranty folder. All
work to be performed may not be covered by the
warra ...
Playing the AM/FM Radio (LX model)
Playing the AM/FM Radio (LX model) ...
System check and vehicle feature customization
Press the SETUP button repeatedly
to cycle the message center through
the following features:
PRESS RESET FOR ENGLISH (if in another language)
When entering the setup menu and a non-English lang ...