 Hyundai Tucson: Headlight aiming adjustment
Before performing aiming adjustment, make sure of the following. 1. Keep all tires inflated to the correct pressure. 2. Place the vehicle on level ground and press the front bumper & rear bumper down several times. Place vehicle at a distance of 118 in. (3m) from the test wall. 3. See that the vehicle is unloaded (except for full levels of coolant, engine oil and fuel, and spare tire, jack, and tools). Have the driver or equivalent weight placed in driver's seat. 4. Clean the head light lenses and turn on the headlights (Low beam). 5. Open the hood.
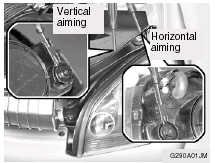
6. Draw a vertical line (through the center of each headlight beam pattern) and a horizontal line (through the center of each headlight beam pattern) on the aiming screen. And then, draw a parallel line at 0.8 in. (21 mm) under the horizontal line. 7. Adjust each cut-off line of the low beam to the parallel line with a phillips screwdriver - VERTICAL AIMING.
WARNING: Never attempt to adjust the horizontal alignment of your headlights. Horizontal aiming must be adjusted by an authorized Hyundai dealer to avoid incorrect alignment that will reduce the effectiveness of your headlights.
 Adjustment After Headlight Assembly Replacement
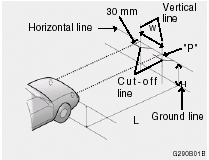
If the vehicle has had front body repair and the headlight assembly has been replaced, the headlight aiming should be checked using an aiming chart as shown in the illustration. Turn on the headlight switch. (Low Beam Position)
1. Adjust headlights so that main axis of light is parallel to center line of the body and is aligned with point "P" shown in the illustration. 2. Dotted lines in the illustration show the center of headlights.
SPECIFICATION:
"H"; Horizontal center line of headlights from ground: 35.6 in.(904 mm). "W"; Distance between each headlight center: 53.4 in.(1,356 mm). "L"; Distance between the headlights and the wall that the lights are tested against: 118 in. (3,000 mm).
 Power steering fluid level
The power steering fluid level should be checked
regularly. To check the power steering fluid
level, be sure the engine is "OFF", then check
to make certain that the power steering f ...
 Replacement of light bulbs
Before attempting to replace a light bulb, be sure
the switch is turned to the "OFF" position.
The next paragraph shows how to reach the
light bulbs so they may be changed. Be sure to ...
See also:
Compass Zone Selection
In most areas, there is a variation
between magnetic north and true
north. Zone selection is required so
the compass can compensate for this
variation. To check and select the
zone, do this: ...
Information for customers in California
Under California law you may be entitled to a replacement of your vehicle or
a refund of the purchase price or lease price, if after a reasonable number of repair
attempts Mercedes-Benz USA, LLC a ...
Loose Fuel Filler Cap Message
If the vehicle diagnostic system determines that the fuel
filler cap is loose, improperly installed, or damaged, a
“gASCAP” message will display in the odometer or a
“CHECK gASCAP” messa ...