 Dodge Nitro: Compass and trip computer
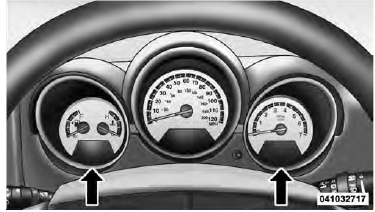
The Compass/Trip Computer features a driverinteractive display (displays information on outside temperature, compass direction, and trip information). It is located on the lower left part of the cluster below the fuel and engine temperature gauge, and the tachometer.
 Compass/Trip Computer Display
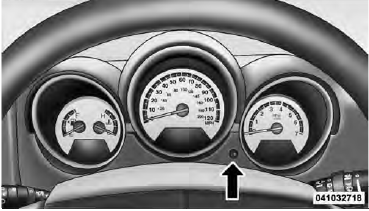
Control Buttons
Press and release the odometer/trip odometer reset button (right side of the instrument cluster) to access the compass/trip computer displays.
NOTE: The system will display the last known outside temperature when starting the vehicle and may need to be driven several minutes before the updated temperature is displayed. Engine temperature can also affect the displayed temperature, therefore temperature readings are not updated when the vehicle is not moving.
 Display Button
The compass/trip computer, when the appropriate conditions
exist, will show the following messages in the
odometer display:
• Door Ajar (door)
• Lift Gate Ajar (gATE)
• Loose Fuel Cap (gASCAP)
These messages can be manually turned off by pressing
the right button (on the instrument cluster).
Trip Conditions
Trip Odometer (ODO) / ECO (Fuel Saver Indicator) This display shows the distance traveled since the last reset. Press and release the right button (on the instrument cluster) to switch from odometer, to Trip A or Trip B, or to ECO. Press and hold the right button while the odometer/trip odometer is displayed to reset.
Trip A
Shows the total distance traveled for trip A since the last reset.
Trip B
Shows the total distance traveled for trip B since the last reset.
ECO (Fuel Saver Indicator)
The ECO-ON indicator will illuminate when you are driving in a fuel efficient manner and can be used to modify driving habits in order to increase fuel economy. The ECO display will toggle between ECO and ECO-ON depending on driving habits and vehicle usage.
Compass/Temperature Display
Compass Variance
Compass Variance is the difference between Magnetic North and Geographic North. To compensate for the differences, the variance should be set for the zone where the vehicle is driven, per the zone map. Once properly set, the compass will automatically compensate for the differences and provide the most accurate compass heading.
NOTE:
• A good calibration requires a level surface and an
environment free from large metallic objects such as
buildings, bridges, underground cables, railroad
tracks, etc.
• Magnetic materials should be kept away from the top
of the right rear quarter window. This is where the
compass sensor is located.
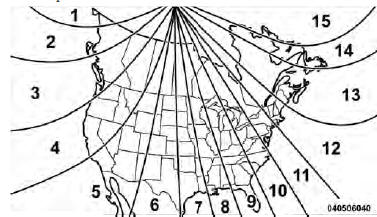 Compass Variance Map
To Set the Variance
Start the engine and leave the transmission gear selector lever in the PARK position. Press and hold the CMTC reset button (for approximately ten seconds) until the current variance zone number is displayed. To change the zone, press and release the CMTC reset button to increase the variance one step. Repeat as necessary until the desired variance is achieved.
NOTE: The factory default zone is 8. During programming, the zone value will wrap around from zone 15 to zone 1.
Manual Compass Calibration
If the compass appears erratic inaccurate or abnormal, you may wish to calibrate the compass. Prior to calibrating the compass, make sure the proper zone is selected. 1. Start the engine and leave the transmission in the PARK position. 2. Press and hold the CMTC reset button (for approximately 10 seconds) until the current variance zone number is displayed.
3. Release the CMTC reset button, then press and hold again for approximately 10 seconds, until the direction is displayed, with the CAL indicator on continuously in the display. 4. To complete the compass calibration, drive the vehicle in one or more complete 360–degree circles, under 5 mph (8 km/h) in an area free from power lines and large metallic objects, until the CAL indicator turns off. The compass will now function normally.
 Instrument cluster descriptions
1. Fuel Gauge
The fuel gauge shows level of fuel in tank when ignition
switch is in the ON position.
2. Fuel Door Reminder
This symbol indicates the side of
the vehicle
where the fuel cap is ...
 Electronic vehicle information center (EVIC)
The Electronic Vehicle Information Center (EVIC) features
a driver-interactive display that is located in the
instrument cluster.
Electronic Vehicle Information Center (EVIC)
This system conv ...
See also:
Range of the sensors
General notes
The sensors must be free of dirt, ice and slush; otherwise they may not function
correctly. Clean the sensors regularly, taking care not to scratch or damage them
().
Side view
...
Heater and air conditioner
- The air conditioner cooling function
operates only when the engine is
running.
- Do not leave children or adults who
would normally require the support
of others alone in your vehicle. ...
Ignition switch light
For easy access to the ignition switch in
the dark, the ignition switch light illuminates
when the driver’s door is opened or
when the driver’s door is unlocked using
the remote keyless en ...