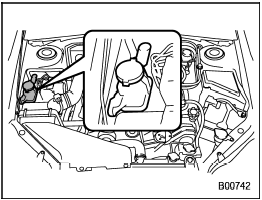
 Subaru Forester: Checking the fluid level
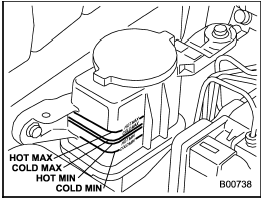
The power steering fluid expands greatly as its temperature rises; the fluid level differs according to fluid temperature.
Therefore, the reservoir tank has two different checking ranges for hot and cold fluids.
Check the power steering fluid level monthly.
1. Park the vehicle on a level surface, and stop the engine.
2. Check the fluid level of the reservoir tank.
When the fluid is hot after the vehicle has been run: Check that the oil level is between “HOT MIN” and “HOT MAX” on the surface of the reservoir tank.
When the fluid is cool before the vehicle is run: Check that the oil level is between “COLD MIN” and “COLD MAX” on the surface of the reservoir tank.
3. If the fluid level is lower than the applicable “MIN” line, add the recommended fluid as necessary to bring the level between the “MIN” and “MAX” line.
If the fluid level is extremely low, it may indicate possible leakage. Consult your SUBARU dealer for an inspection.

Be careful not to burn yourself because the fluid may be hot.

- When power steering fluid is being added, use only clean fluid, and be careful not to allow any dirt into the tank. And never use different brands together.
- Be careful not to spill power steering fluid when adding it. If power steering fluid touches the exhaust pipe, it may cause a bad smell, smoke, and/or a fire. If power steering fluid gets on the exhaust pipe, be sure to wipe it off.

 Recommended fluid
Refer to “Fluids”. ...
See also:
Engine Drive Belt Routing
2.4L L4 Engine
3.0L V6 Engine ...
Event data recorder
This vehicle is equipped with an event data recorder (EDR). The main purpose
of an EDR is to record, in certain crash or near crash-like situations,
such as an air bag deployment or hitting a road o ...
Parking Brake
To apply the parking brake, push the
pedal down with your foot. To
release it, push on the pedal again.
The parking brake indicator on the
instrument panel should go out when
the parking ...