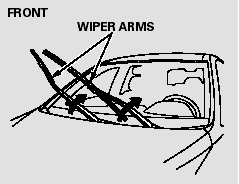
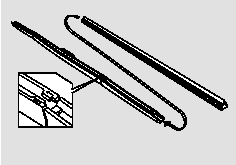
Honda CR-V: Wiper Blades
Check the condition of the wiper blades at least every six months.
Replace them if you find signs of cracking in the rubber, areas that are getting hard, or if they leave streaks and unwiped areas when used.
To replace a front wiper blade:
1. Raise each wiper arm off the windshield, lifting the driver’s side first, then the passenger’s side.

Do not open the hood when the wiper arms are raised, or you will damage the hood and the wiper arms.
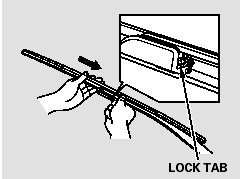
2. Disconnect the blade assembly from the wiper arm:
Press and hold the lock tab.
Slide the blade assembly toward the lock tab until it releases from the wiper arm.
When replacing a wiper blade, make sure not to drop the wiper blade or wiper arm down on the windshield.
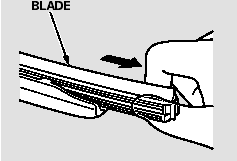
3. Remove the blade from its holder by grasping the tabbed end of the blade. Pull firmly until the tabs come out of the holder.
4. Examine the new wiper blades. If they have no plastic or metal reinforcement along the back edge, remove the metal reinforcement strips from the old wiper blade, and install them in the slots along the edge of the new blade.
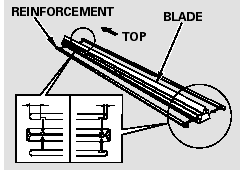
Make sure the three rubber tabs inside the blade fit to each notch of the reinforcement, as shown.
5. Place the top of the wiper blade on the end of the blade assembly, and slide the blade onto the assembly in the direction pointed to by the arrow.
Make sure the blade is completely installed.
6. Slide the wiper blade assembly onto the wiper arm.Make sure it locks in place.
7. Lower the wiper arm down against the windshield, the passenger’s side first, then the driver’s side.
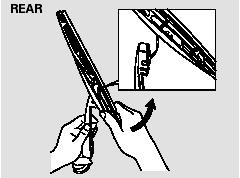
To replace a rear wiper blade:
1. Raise the wiper arm off the rear window.
2. Disconnect the blade assembly from the wiper arm by pivoting the blade assembly upward.
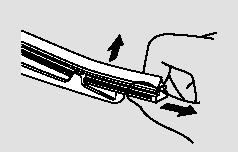
3. Pull one end of the blade out from the holder.
Slide the blade out of the holder.
4. Examine the new wiper blades. If they have no plastic or metal reinforcement along the back edge, remove the metal reinforcement strips from the old wiper blade, and install them in the slots along the edge of the new blade.
5. Slide the new blade into the holder.
Make sure it is engaged in the slot along its full length.
Insert both ends of the blade into the holder. Make sure they are secure.
6. Install the wiper blade assembly onto the wiper arm.Make sure it locks in place.
7. Lower the wiper arm against the windshield.
READ NEXT:
 Tires
Tires
To safely operate your vehicle, your
tires must be the proper type and
size, in good condition with adequate
tread, and correctly inflated.
The following pages give more
detailed information
Inflation Guidelines
Keeping the tires properly inflated
provides the best combination of
handling, tread life, and riding
comfort.
Underinflated tires wear unevenly,
adversely affect handling and fuel
economy,
Recommended Tire Pressures
]The following chart shows the
recommended cold tire pressures for
most normal and high-speed driving
conditions.
Tire Size
Cold Tire Pressure for Normal Driving
225/65R17 10
SEE MORE:
Starting the Engine
1. Apply the parking brake.
2. In cold weather, turn off all
electrical accessories to reduce
the drain on the battery.
3. Make sure the shift lever is in
Park. Press on the brake pedal.
4. Without touching the accelerator
pedal, turn the ignition key to the
START (III) position. Do not
Lap/Shoulder Belt
The lap/shoulder belt goes over
your shoulder, across your chest,
and across your hips.
To fasten the belt, insert the latch
plate into the buckle, then tug on the
belt to make sure the buckle is
latched (see page for how to
properly position the belt).
To unlock the belt, press the re
