Range Rover Evoque: Touch screen overview
Note: Physical controls are referred to as hard
keys. Virtual buttons on the touch screen are
referred to as soft keys.
Screen options will vary depending on vehicle
specification and set-up.
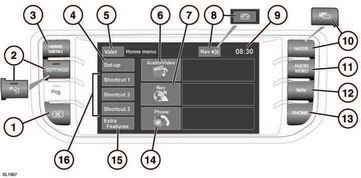
Touch screen overview
1. Screen on/off. The first use after switching the ignition on will display the Home Menu. Subsequent switching on will display the last used screen or menu.
2. SETTINGS. Press for direct access to the settings menu. When Park Assist is specified, the icon is changed and the button will turn Park Assist on and off. The Settings menu is then accessed via the touch screen.
3. HOME MENU. Press for direct access to the Home menu. Content will depend upon vehicle specification and options selected.
4. Touch to select the Set-up menu.
5. Touch to select Valet mode.
6. Touch to select the Audio/Video menu. An overview of current audio/video information is displayed.
7. Touch to select the On road Navigation menu. Current set destination is displayed.
8. While navigation is operating, touch to repeat the last given navigation instruction.
During a phone call, the icon is temporarily changed. Touch to end the call.
9. Time display. Touch to select time or date adjustment.
10. MODE. Press repeatedly to scroll through all audio/video sources. When Dual view is fitted, the button icon is changed.
11. AUDIO VIDEO. Press for direct access to the Audio/Video menu.
12. NAVIGATION. Press for direct access to the Navigation menu.
13. PHONE. Press for direct access to the Telephone menu.
14. Touch to select Phone.
15. Extra features. Touch to display list.
16. Shortcut keys. Use for personal shortcuts to any part of the system. Shortcuts can be made in the Set-up menu.
READ NEXT:
 Using the touch screen
Always run the engine during
prolonged
use of the touch screen. Failure to do so
may discharge the vehicle battery,
preventing the engine from starting.
Avoid spilling or splashing liquids onto
Touch screen display icons
Some touch screen display icons are displayed
on subsequent screens and may not all be
displayed at the same time, e.g.
Back soft key: Touch to return to
the previous screen displayed.
Pop-ups
Some menus and control screens will appear
as pop-ups, overlaying the current screen.
Warning and information pop-ups may also
appear on the display. Take notice of any
warnings and follow any on-
SEE MORE:
Anti-lock Braking System (ABS)
Anti-lock Braking Control Module (ABS)
CAUTION: Diagnosis
by substitution from a donor vehicle is NOT acceptable. Substitution of control
modules does
not guarantee confirmation of a fault, and may also cause additional faults in
the vehicle being tested and/or the donor
vehicle.
NOTES:
If the
Locking wheel nuts
Locking wheel nuts can be removed only by
using the special adapter provided in the tool
kit.
Note: When the vehicle is first supplied, the
adapter may be stored in the glove
compartment. It should be removed and stored
in the tool kit as soon as possible.
Note: A code number is stamped onto
