Range Rover Evoque: Timed climate remote control
The dedicated remote control has a range of approximately 100m (328ft). Press and hold the ON button for two seconds.
Note: Avoid touching the antenna when operating the ON or OFF button.
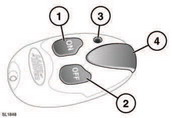
Timed climate remote control
1. On button.
2. Off button.
3. LED (operation indicator).
4. Antenna.
Press and hold the ON button for approximately two seconds. The green LED will illuminate for 2 seconds to confirm that a program has been initiated. The LED flashes once every 2 seconds to indicate that the program is active.
The timed climate program will continue for 30 minutes and then switch off automatically to prevent the vehicle battery from discharging. It also turns off automatically if the engine is started.
The system may not operate, or will switch off automatically, if: - Fuel level is low.
- The vehicle’s battery charge is low.
- Engine coolant temperature is at or above its required temperature.
- The engine has not been started since the last programme cycle.
The remote control LED indicator signals other states and conditions for the timed climate as follows: - Illuminates red for 2 seconds when the OFF button is pressed, to indicate that the program has stopped.
- Flashes green or red for 2 seconds then stops when the ON or OFF buttons are pressed, to indicate that no action has been taken.
- Illuminates orange for 2 seconds before showing green or red, to indicate that the remote battery is low.
- Flashes orange for 5 seconds to indicate that no action has been taken and the remote battery should be replaced.
READ NEXT:
 Replacing remote control batteries
Replacing remote control batteries
With the back of the remote control facing
upwards, use a coin or similar implement to
rotate the battery cover. Lift the cover off to
reveal the battery compa
Additional remote controls
A maximum of three controls can be
programmed to each vehicle. Contact your
Land Rover dealer to purchase additional units
and have them programmed to your vehicle.
SEE MORE:
Radiator
Removal
NOTES:
Removal steps in this procedure may contain installation details.
Some variation in the illustrations may occur, but the essential information is
always correct.
1. WARNING: Make sure to support the vehicle with axle stands.
Raise and support the vehicle.
2. Refer to: Cooling System
Rear Seat
Entertainment Module (REM)
CAUTION:
Diagnosis by substitution from a donor vehicle is NOT acceptable. Substitution
of control modules does
not guarantee confirmation of a fault and may also cause additional faults in
the vehicle being checked and/or the donor
vehicle.
NOTES:
If the control module or a component
