Honda CR-V: Disc Player Error Messages (EX-L model with navigation system)

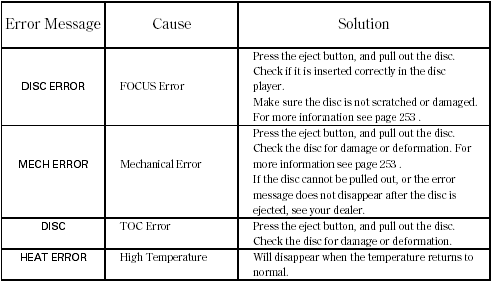
If you see an error message in the
display while playing a disc, find the
cause in the chart to the right. If you
cannot clear the error message, take
your vehicle to your dealer.
The chart on the right explains the
error messages you may see in the
display while playing a disc.
If you see an error message in the
display while playing a disc, press
the eject button. After ejecting the
disc, check it for damage or
deformation. If there is no damage,
insert the disc again.
For additional information on
damaged discs.
Insert a different disc. If the new
disc plays, there is a problem with
the first disc. If the error message
cycle repeats and you cannot clear it,
take your vehicle to a dealer.
The audio systemwill try to play the
disc. If there is still a problem, the
error message will reappear. Press
the eject button, and pull out the disc.
READ NEXT:
CD Changer (EX-L model with navigation system)
Your vehicle has the CD changer in
the center console.
CD-R, CD-RWdisc, and CD
compressed inMP3 andWMA will
not work in this unit. Video CDs and
DVD discs also will not work.
Do not spill an
To play CDs, the ignition switch
must be in the ACCESSORY (I) or
ON (II) position.
You operate the CD changer with
the same controls used for the indash
disc player or the radio. To
select
SEE MORE:
Airbag System Components
Your airbag system includes:
Two SRS (supplemental restraint
system) front airbags. The driver’s
airbag is stored in the center of
the steering wheel; the front
passenger’s airbag is stored in the
dashboard. Both are marked ‘‘SRS AIRBAG’’
Two
1. Make sure the battery connections are good and
the battery is sufficiently charged.
2. Connect a VAT-40 (or equivalent tester), and turn
the selector switch to position 1 (starting).
3. Start the engine. Hold the engine speed at
3,000 rpm with no load until the radiator fan comes
on, then let i
© 2016-2024 Copyright www.hcrv.net


