 Mitsubishi Outlander: Replacement of lamp bulbs
Before replacing a bulb, ensure the lamp is off. Do not touch the glass part of the new bulb with your bare fingers; the skin oil left on the glass will evaporate when the bulb gets hot and the vapour will condense on the reflector and dim the surface.
CAUTION:
● Bulbs are extremely hot immediately after being turned off. When replacing a bulb,
wait for it to cool sufficiently before touching it. You could otherwise be burnt.
NOTE:
● If you are unsure of how to carry out the work as required, we recommend you to
consult a specialist.
● Be careful not to scratch the vehicle body when removing a lamp or lens.
● When it rains, or when the vehicle has been washed, the inside of the lens sometimes
becomes foggy. This is the same phenomenon as when window glass mists up on a humid
day, and does not indicate a functional problem. When the lamp is switched on, the
heat will remove the fog. However, if water gathers inside the lamp, we recommend
you to have the lamp checked.
Bulb capacity
When replacing a bulb, use a new bulb with the same wattage and colour.
Outside
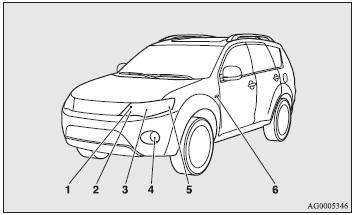
1- Headlamps (high beam): 60 W (HB3). 2- Position lamps: 5 W (W5W). 3- Headlamps (low beam). < Halogen bulb >: 51 W (HB4). < Discharge bulb >: 35 W (D2R). 4- Front fog lamps: 55 W (H11). 5- Front turn-signal lamps: 21 W (WY21W). 6- Side turn-signal lamps: 5 W (W5W).
Codes in parentheses indicate bulb types.
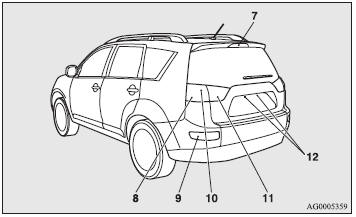
7- High mounted stop lamp. 8- Rear turn-signal lamps: 21 W (WY21W). 9- Rear fog lamp (driver’s side): 21 W (W21W). 10- Tail lamps / Stop lamps. 11- Reversing lamps: 21 W (W21W). 12- Licence plate lamps: 5 W (W5W).
Codes in parentheses indicate bulb types.
WARNING:
● Always consult a specialist when repairing or replacing the bulbs of discharge
headlamps. This is because the power circuit, bulbs and electrodes generate a high
voltage that could cause an electric shock.
NOTE:
● An LED, not a bulb, is used in the stop lamp/tail lamp and high mounted stop lamp.
Contact a MITSUBISHI MOTORS Authorised Service Point when there is a need for repair
or replacement.
● For the side turn-signal lamp, it is not possible to repair or replace just the
bulb. Contact a MITSUBISHI MOTORS Authorised Service Point when there is a need
for repair or replacement.
Inside
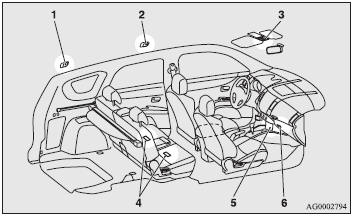
1- Luggage room lamp: 8 W. 2- Room lamp (rear): 8 W. 3- Map & room lamps (front): 8 W. 4- Foot lamps: 1.4 W. 5- Centre console down light. 6- Lower glove box lamp: 1.4 W.
NOTE:
● An LED, not a bulb, is used in the centre console down light. Contact a MITSUBISHI
MOTORS Authorised Service Point when there is a need for repair or replacement.
Headlamps
Replacement of low beam (halogen lamp type)
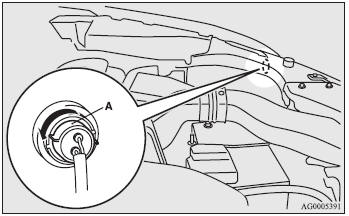
1. When replacing the bulb on the left side of the vehicle, remove the bolt (A) holding down the relay box and move the relay box toward the rear of the vehicle.
2. Turn the bulb (B) anticlockwise and remove it.
3. While holding down the tab (C), pull out the socket (D).
CAUTION:
● Handle halogen lamp bulb with care. The gas inside halogen lamp bulb is highly
pressurized, so dropping, knocking, or scratching a halogen lamp bulb can cause
it to shatter.
● Never hold the halogen lamp bulb with a bare hand, dirty glove, etc. The oil from
your hand could cause the bulb to break the next time the headlamps are operated.
If the glass surface is dirty, it must be cleaned with alcohol, paint thinner, etc.,
and refit it after drying thoroughly.
Replacement of low beam (discharge lamp type)
WARNING:
● Always consult a specialist when replacing the bulbs of discharge headlamps. This
is because the power circuit, bulbs and electrodes generate a high voltage that
could cause an electric shock.
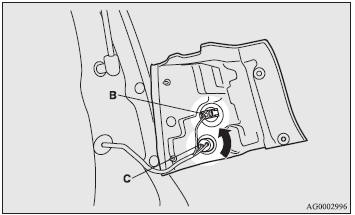
Replacement of high beam
1. When replacing the bulb on the right side of the vehicle, remove the bolt (A) fastening the washer fluid reservoir spout and move the spout in the rear direction.
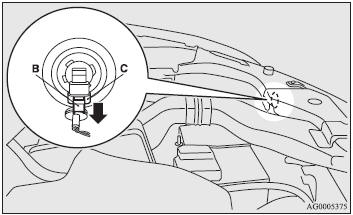
2. While holding down the tab (B), pull out the socket (C).
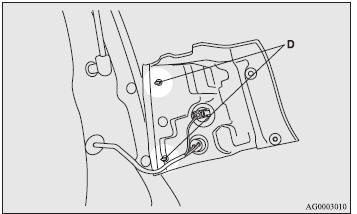
3. Turn the bulb (D) anticlockwise and remove it.
CAUTION:
● Handle halogen lamp bulb with care. The gas inside halogen lamp bulb is highly
pressurized, so dropping, knocking, or scratching a halogen lamp bulb can cause
it to shatter.
● Never hold the halogen lamp bulb with a bare hand, dirty glove, etc. The oil from
your hand could cause the bulb to break the next time the headlamps are operated.
If the glass surface is dirty, it must be cleaned with alcohol, paint thinner, etc.,
and refit it after drying thoroughly.

Position lamps

1. When replacing the bulb on the right side of the vehicle, remove the bolt (A) fastening the washer fluid reservoir spout and move the spout in the rear direction.
2. To ensure that you have enough space to work, pull out the socket (B) while pushing down on the tab (C) on the headlamp (high beam) (D).
3. Turn the position lamp socket (E) anticlockwise and remove it.
4. Remove the bulb from the socket.
NOTE:
● Securely install the headlamp (high beam) socket after replacing the bulb.
Front turn-signal lamps
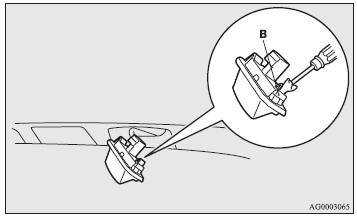
1. Turn the socket (A) anticlockwise and remove it.
2. Remove the bulb from the socket.
Side turn-signal lamps
For the side turn-signal lamp, it is not possible to repair or replace just the bulb. Contact a MITSUBISHI MOTORS Authorised Service Point when there is a need for repair or replacement.
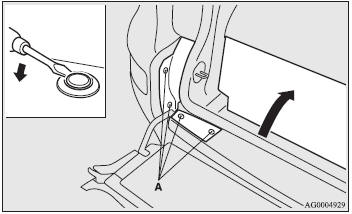
Front fog lamps*
1. Insert a minus screwdriver with the end covered with a cloth or other object to wedge out the bezel (A).
2. Remove the five bolts (B) for the front bumper under cover.
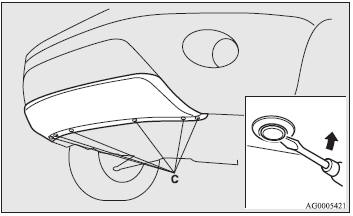
3. Insert a minus screwdriver or other object into the clip groove to wedge out the six clips (C) toward the vehicle body, then remove the front bumper under cover.
4. Remove the cover below the fog lamp that you will replace. Insert a minus screwdriver into the clip groove on the cover to wedge out the clips (D) toward the vehicle body, then remove the cover.
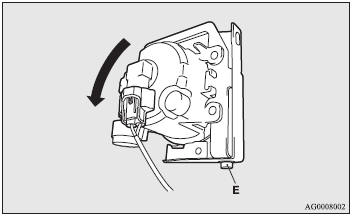
5. In order to secure space to work, remove the bolt (E) and tilt the front fog lamp unit in the direction of the arrow.
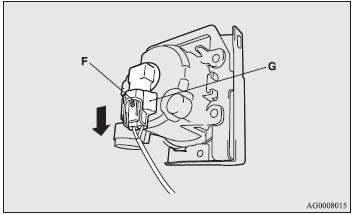
6. While holding down the tab (F), pull out the socket (G).
7. Turn the bulb (H) anticlockwise and remove it.
CAUTION:
● Handle halogen lamp bulb with care. The gas inside halogen lamp bulb is highly
pressurized, so dropping, knocking, or scratching a halogen lamp bulb can cause
it to shatter.
● Never hold the halogen lamp bulb with a bare hand, dirty glove, etc. The oil from
your hand could cause the bulb to break the next time the fog lamps are operated.
If the glass surface is dirty, it must be cleaned with alcohol, paint thinner, etc.,
and refit it after drying thoroughly.
Rear fog lamp (driver’s side)
1. Open the lower gate and pull back the cover between the passenger compartment and the lower gate. 2. Remove the cover after you remove each of the 4 clips (A) by inserting a screw driver into the clip groove and levering it toward the vehicle body.
3. Remove the lamp mounting screws (B) and remove the lamp unit.
4. Remove the socket and bulb assembly (C) together by turning it anticlockwise, and then remove the bulb by pulling it out.
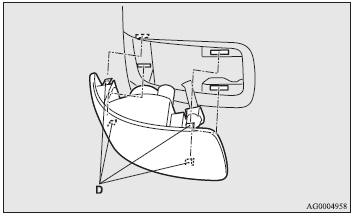
NOTE:
● When mounting the lamp unit, align the pins (D) on the lamp unit with the hole
in the body.
Rear combination lamps
1. Remove the screws (A), and then remove the lamp unit.
B- Stop lamps/tail lamps (LED) - Cannot be replaced. C- Rear turn-signal lamps.
2. Turn the socket anticlockwise and remove it.
3. Remove the bulb from the socket.
NOTE:
● An LED, not a bulb, is used in the stop lamp/tail lamp. Contact a MITSUBISHI MOTORS
Authorised Service Point when there is a need for repair or replacement.
● When installing the lamp unit, align the lamp unit pins (D) with the holes on
the vehicle body and install.
Reversing lamps
1. Open the tailgate. 2. Insert a minus screwdriver with the end covered with a cloth or other object into the cut out area of the cover to wedge out the cover.
3. Turn the socket (A) anticlockwise and remove it.
4. Remove the bulb from the socket.
High mounted stop lamp
NOTE:
● An LED, not a bulb, is used in the high mounted stop lamp. Contact a MITSUBISHI
MOTORS Authorised Service Point when there is a need for repair or replacement.
Licence plate lamps
1. Remove while pressing the lamp unit (A) to the left side of the vehicle.
2. Insert a minus screwdriver with the end covered with a cloth or other object to press the hook (B) aside and remove the lens.
3. Remove the bulb from the socket.
NOTE:
● When installing the lamp unit, first insert the end of tab (C) and then align
tab (D).
Map & room lamps (front)
1. Insert a minus screwdriver with the end covered with a cloth or other object to prise out the lens.
2. While holding down the tab (A), pull out the bulb.
NOTE:
● When replacing the bulb, put the map room lamp (front) switch in the OFF position.
● When installing the lens, align the hooks (B) to the holes in the vehicle body.
Room lamp (rear) / luggage room lamp
1. Insert a minus screwdriver with the end covered with a cloth or other object into the cut out area of the lens to wedge out the lens.
2. While holding down the tab (A), pull out the bulb.
NOTE:
● When replacing the bulb, put the room lamp (rear) / luggage area lamp switch in
the “OFF” position.
● When installing the lens, align the hooks (B) to the holes in the vehicle body.
Glove box lamp

1. Turn the socket (A) anticlockwise and remove it.
2. Remove the bulb.
Foot lamps*
1. Insert a minus screwdriver with the end covered with a cloth or other object into the cut out area of the lens to wedge off the cover.
2. Remove the bulb.
Centre console down light
NOTE:
● An LED, not a bulb, is used in the centre console down light. Contact a MITSUBISHI
MOTORS Authorised Service Point when there is a need for repair or replacement.
 Fuses
Fuses
Fuse block location
To prevent damage to the electrical system due to shortcircuiting or overloading,
each individual circuit is provided with a fuse. There are fuse blocks in the passenger
compa ...
 Specifications
...
See also:
Adaptive front lighting (amber)
Adaptive front lighting (amber)
Illuminates when there is a fault.
The headlamps will still operate,
but without this feature operating
correctly.
Seek qualified assistance as soon as possible. ...
Vehicle identification
■ Vehicle identification number
The vehicle identification number (VIN) is the legal identifier for your
vehicle. This is the primary identification number for your Toyota. It is
used in regi ...
Changing the display
Changing the display
Press the TRIP button on the end of the left
column stalk repeatedly to display the trip data
in the following order:
- Date and odometer.
- Trip distance.
- Average speed ...