Honda CR-V: Remote Audio Controls
If equipped
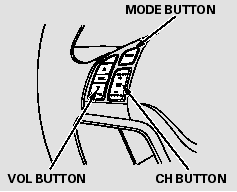
Three controls for the audio system are mounted in the steering wheel hub. These let you control basic functions without removing your hand from the wheel.
The VOL button adjusts the volume
up (  ) or down (
  ). Press the top
or bottom of the button and hold it
until the desired volume is reached,
then release it.
). Press the top
or bottom of the button and hold it
until the desired volume is reached,
then release it.
The MODE button changes the mode.
On models with Navigation System
Pressing the MODE button repeatedly cycles through all possible media sources whether they are present or not.
On models without Navigation System
Pressing the MODE button repeatedly cycles through all present, connected media sources. Media sources that are not present or connected will not appear when cycling with the MODE button.
If you are listening to the radio, use the CH button to change stations.
Each time you press the top ( + ) of the button, the system goes to the next preset station on the band you are listening to. Press the bottom ( - ) to go back to the previous station. If you press and hold the CH button ( + ) or ( - ), the system goes into the seek mode. It finds a station with a strong signal.
If you are playing a disc, the system skips to the beginning of the next track (file in MP3 or WMA format) each time you press the top ( + ) of the CH button. Press the bottom ( - ) to return to the beginning of the current track/file. Press it twice to return to the previous track/file.
You will see the track/file number and the elapsed time. If the disc has text data or is compressed inMP3 or WMA, you can also see any other information (track title, file name, folder name, etc.).
In MP3 or WMA mode, you can use the seek function to select folders.
Press and hold the top ( + ) of the CH button until you hear a beep to skip forward to the first file of the next folder. Press the bottom ( - ) to skip backward to the previous folder.
On Navigation model
If you are playing a PC card, press the top ( + ) of the CH button to advance to the next file. Press the bottom ( - ) to go back to the previous file.
If you are playing a USB flash memory device or iPod with the USB adapter cable, press and release the top ( + ) of the CH button to skip forward to the beginning of the next file. Press the bottom ( - ) to skip backward to the beginning to the current file. Press it twice to return to the previous file.
READ NEXT:
 Playing an Optional Audio Unit
Your vehicle has the auxiliary input
jack on the front panel, on the center
table, or in the console compartment,
depending on models. The system
will accept auxiliary input from
standard
Radio Theft Protection
Your vehicle’s audio system will
disable itself if it is disconnected
from electrical power for any reason.
To make it work again, you must
enter a specific code using the preset
buttons (i
Setting the Clock
On models without navigation system
To set the time, press the CLOCK
button until you hear a beep. The
displayed time begins to blink.
Change the hours by pressing the H
(hour) button until th
SEE MORE:
DTC P0010: VTC Oil Control Solenoid Valve
Malfunction
NOTE: Before you troubleshoot, record all freeze data and any on-board
snapshot, and review the general troubleshooting information.
1. Turn the ignition switch ON (II).
2. Clear the DTC with the HDS.
3. Start the engine. Hold the engine speed at
3,000 rpm without load (in Park or neutral) until
Transfer Assembly Inspection/Removal/Installation
Transfer Assembly Inspection
1. Shift the transmission into the N position.
2. Raise the vehicle on a lift, and make sure it is
supported securely.
3. Make a reference mark (A) across the propeller
shaft (B) and the transfer companion flange (C).
4. Separate the propeller shaft from the transfer
