Honda CR-V: Rearview Camera and Monitor
On EX-L model with navigation system
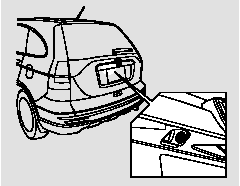
Whenever you shift to reverse (R) with the ignition switch in the ON (II) position, the rearview is shown on the navigation system screen.
For the best picture, always keep the rearview camera clean, and do not cover the camera lens. To avoid scratching the lens when you clean it, use a moist, soft cloth.
When in reverse, the touch screen
and navigation system ‘‘hard’’
buttons are locked out, except the
‘‘ZOOM’’ button. Touching the ‘‘  ’’
or ‘‘
’’
or ‘‘  ’’ button allows you to
adjust
the brightness of the rearview
camera image.
’’ button allows you to
adjust
the brightness of the rearview
camera image.

The camera brightness cannot be adjusted by voice control.
Since the rearview camera display area is limited, you should always back up slowly and carefully, and look behind you for obstacles.
READ NEXT:
 Cruise Control
Cruise control allows you to maintain
a set speed above 25 mph (40 km/h)
without keeping your foot on the
accelerator pedal. It should be used
for cruising on straight, open
highways. It is
Using the Cruise Control
1. Push the CRUISE button on the
steering wheel. The CRUISE
MAIN indicator on the instrument
panel comes on.
The cruise control systemcan be
left on, even when it is not in use.
2. Acceler
Changing the Set Speed
You can increase the set cruising
speed in any of these ways:
Press and hold the RES/ACCEL
button. When you reach the
desired cruising speed, release the
button.
To increase the speed in ver
SEE MORE:
Ceiling Light
The ceiling light has a three-position
switch: ON, Door Activated, and
OFF. In the Door Activated (center)
position, the light comes on when
you:
Open any door.
Unlock the doors and the tailgate
with the key or remote transmitter.
After all doors and the tailgate are
closed tightl
Oil Pan Removal
1. If the engine is already out of the vehicle, go to step
20.
2. Raise the vehicle on the lift to full height.
3. Drain the engine oil.
4. Remove the front wheels.
5. Remove the splash shield (see step 21).
6. Disconnect the air fuel ratio (A/F) sensor connector
and secondary heated oxygen sen
