 Mitsubishi Outlander: Making a luggage room
WARNING:
● When making a luggage area, never arrange the seats while the vehicle is being
driven or is on an incline. The seats could move unexpectedly or more than required
and cause a serious accident.
CAUTION:
● Do not stack luggage in the vehicle higher than the seatback height. Also, firmly
secure the luggage. Serious accidents could result due to unrestrained objects entering
the passenger compartment during sudden braking.
● Be careful not to catch your hands or feet when arranging the seat. Personal injury
could result.
To collapse the second seat
The second seat can be collapsed automatically with the second seat lever or the luggage area switch. On vehicles with a third seat, the same operation can be performed with the second seat lock release belt.
NOTE:
● On vehicles with a third seat, collapse the second seat to get on or off the third
seat. Refer to “Accessing the underfloor- stowable third seat” on page 2-13.
● The seatbacks can be moved one side at a time.
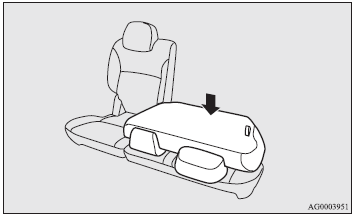
To collapse
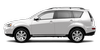
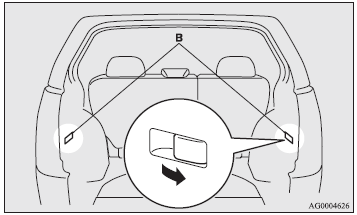
1. Lower the head restraints of the second seat to the lowest position. Refer to “Head restraints: To adjust height” on page 2-22. 2. Use the second seat lever (A), the luggage area switch (B) or the second seat lock release belt (C).
Second seat lever operation
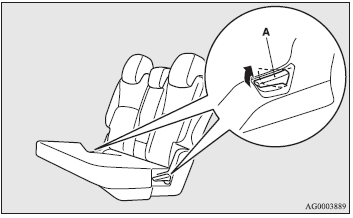
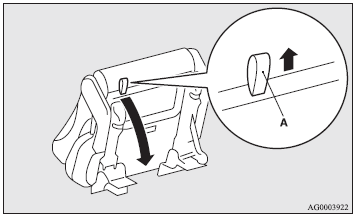
Luggage area switch operation
While the tailgate or a rear door is open, pull the switch (B) for about 1 second or more.
Second seat lock release belt operation
3. The seatbacks fold forward, and then the entire seat unit rises up while moving forward.
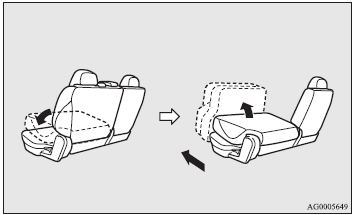
4. After these operations, lightly push the seat and seatback to make sure they are set firmly in place.
WARNING:
● When folding the seatbacks forward from behind, an adult should perform the operation,
making sure there is no one in the second seat. The seatback could fall forward
suddenly and trap the person between it and the seat cushion, causing a serious
injury. It is difficult to see the second seat from behind, so be especially careful
of small children.
CAUTION:
● The exhaust pipe is still hot for a while after stopping the engine, so be sure
not to touch it.
● Do not let people sit on the held seats, and do not place luggage on them. The
installation fitting of the seat could be deformed, making it impossible to secure
the seat to the vehicle.
NOTE:
● Always store the buckles in the second seat cushion slits before folding the seatbacks
forward. If the seatback is folded forward while the buckles are not stored, it
could damage the seat (refer to “Second and third seat belt storage” on page 2-38).
To replace
1. While supporting the seat with your hand, lower the seat while pulling the lock release belt (A) on the rear of the seat cushion.
CAUTION:
● On vehicles with a third seat, when returning the second seat while there are
occupants in the third seat, be careful not to trap the feet of the third seat occupants
with the second seat.
NOTE:
● On vehicles with a third seat, the rear of the seat cushion of the second seat
is equipped with a foot lamp (B). When the lock release belt is pulled, the lamp
illuminates for about 10 seconds to light the foot area of the third seat occupants.
2. Push down the seats until they click to firmly lock in place.
NOTE:
● Luggage can be loaded while the seatbacks are folded forward.
3. Fold up the seatback while pulling the lock release belt on the rear of the seatback.
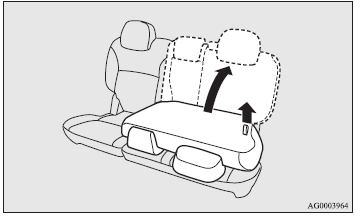
4. After returning the seatback, lightly push the seat and seatback to make sure they are set firmly in place.
 Head restraints
WARNING:
● Driving without the head restraints in place can cause you and your passengers
serious injury or death in an accident. To reduce the risk of injury in an accident,
always make s ...
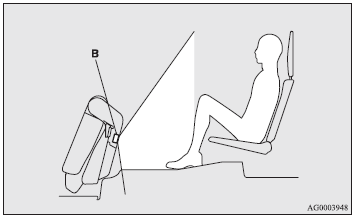
 Making a flat seat
By removing the head restraints and fully reclining the seatbacks of the seats,
one large flat seat is achieved.
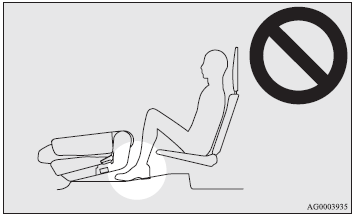
WARNING:
● Never drive while there are occupants sitting on the flat seat. T ...
See also:
Occupant safety using seat belts
Occupant safety using seat belts
1. Putting on a seat belt:
Draw the belt out smoothly, ensure that the
belt height, the seat and your position on
the seat, are correct.
WARNING:
Seatbelts a ...
Repeat play
Press (RPT).
To cancel, press (RPT) again. ...
Tire pressures and wear
Maintaining the correct tire pressures
helps to maximize the tires’ service lives
and is essential for good running performance.
Check and, if necessary, adjust
the pressure of each tire (inc ...