 Mitsubishi Outlander: LW/MW/FM digital tuning radio with CD player*
The audio system can only be used when the ignition switch is in the “ON” or “ACC” position.
NOTE:
● When listening to the audio system with the engine stopped, be sure to turn the
ignition switch to the “ACC” position.
● If a cellular phone is used inside the vehicle, noise may be produced by the audio
equipment. This does not mean that anything is wrong with your audio equipment.
In such a case, use the cellular phone at a place as far away as possible from the
audio equipment.
● If foreign objects or water get into the audio equipment, or if smoke or a strange
odour comes from it, immediately turn off the audio system. We recommend that you
have it inspected. Never try to repair it by yourself. Avoid continuous usage without
inspection by a qualified person.
Volume and tone control panel
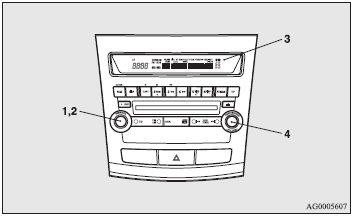
1- PWR (Power ON/OFF) switch. 2- VOL (Volume control) knob. 3- Display. 4- SOUND (Sound control) switch.
To adjust the volume
VOL (Volume control)
Turn the VOL knob (2) clockwise to increase the volume; anticlockwise to decrease the volume.
To adjust the tone
Press the SOUND switch (4) to select: TYPE → FIELD → BASS → MID → TREBLE → FADER → BALANCE → audio control mode OFF.
QUICK ACCESS MODE
To access the sound customisation features quickly, push and hold the SOUND switch (4), then turn the switch clockwise or anticlockwise to access your desired sound customisation setting. Release the switch to adjust the setting.
HOLD MODE
If the SOUND switch (4) is pushed and held for more than 2 seconds during the audio adjust mode, it will change to “Hold” mode. The selected audio mode will be held until the SOUND switch (4) is pushed for more than 2 seconds again.
TYPE (Acoustic characteristic selection)
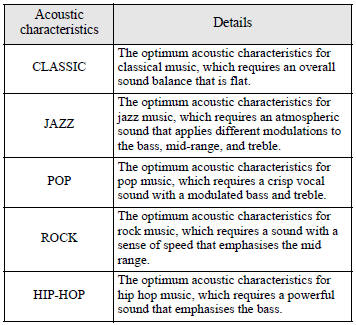
1. Turn the SOUND switch (4) to select the desired music type. 2. Press the SOUND switch (4) to set the audio system to the selected music type.
FIELD (Sound field selection)
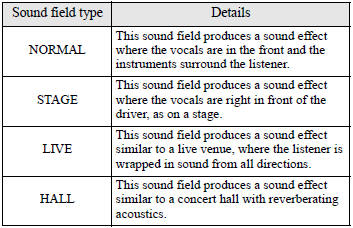
1. Turn the SOUND switch (4) to select the desired sound field. 2. Press the SOUND switch (4) to set the audio system to the selected sound field.
BASS (Bass tone control)
Turn the SOUND switch (4) to select the desired bass tone.
MID (Middle tone control)
Turn the SOUND switch (4) to select the desired middle tone.
TREBLE (Treble tone control)
Turn the SOUND switch (4) to select the desired treble tone.
FADER (Front/Rear balance control)
Turn the SOUND switch (4) to balance volume from the front and rear speakers.
BALANCE (Left /Right balance control)
Turn the SOUND switch (4) to balance volume from the left and right speakers.
NOTE:
● When set to 0, it will beep.
● When TYPE or FIELD is changed, the sound will cut out briefly, but this does not
indicate a malfunction.
● The audio control mode will shut off if either the radio or CD is operated, or
if no adjustment is made within about 10 seconds.
SCV (Speed Compensated Volume) function
SCV function is a feature that automatically adjusts the VOLUME, BASS, MID, and TREBLE settings in accordance with the vehicle speed. The SCV function can be turned ON and OFF. Refer to “Function setup mode” on page 5-29.
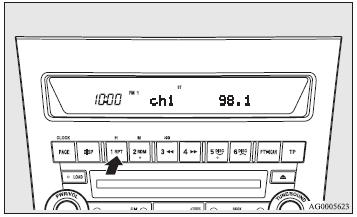
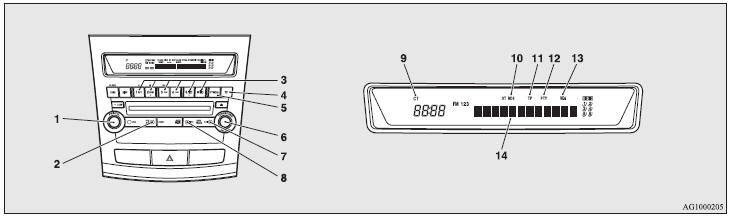
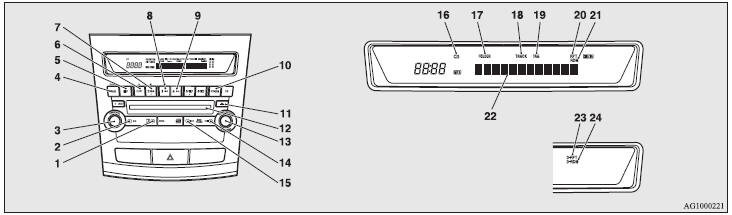
Radio control panel and display

1- PWR (Power ON/OFF) switch. 2- AM/FM (FM/MW/LW selection) button. 3- Memory select buttons. 4- TUNE switch. 5- SEEK (Up-seek) button. 6- SEEK (Down-seek) button. 7- FM (FM1/FM2/FM3) indicator. 8- ST (Stereo) indicator.
To listen to the radio
1. Press the PWR switch (1) or the AM/FM button (2) to turn ON the radio. Press the PWR switch again to turn OFF the radio. 2. Press the AM/FM button (2) to select the desired band. 3. Turn the TUNE switch (4), or press the SEEK button (5 or 6) or memory select buttons (3) to tune into a radio broadcasting station.
To tune the radio
Automatic tuning
After pressing the SEEK button (5 or 6), a receivable station will be automatically selected and reception of the station will begin.
Manual tuning
The frequency changes every time the TUNE switch (4) is turned. Turn the switch to select the desired radio broadcasting station.
To enter frequencies into the memory
Manual setting
You can assign to the memory select buttons (3) a maximum of 18 stations in the FM band (6 FM1, 6 FM2 and 6 FM3 stations) and 6 stations each in the MW and LW band (stations already assigned to the memory select buttons are replaced by any newly assigned stations).
Follow the steps described below. 1. Press the SEEK button (5 or 6), or turn the TUNE switch (4) to tune to the frequency you wish to keep in the memory. 2. Press one of the memory select buttons (3) until it beeps. The sound will be momentarily interrupted while the frequency is being entered into the memory. The number of the button matching the entry in the memory as well as the frequency is displayed. 3. The preset memory setting is retrieved by pressing the button and then releasing it within 1 second.
NOTE:
● Disconnecting the battery terminal erases all the radio frequencies stored in
the memory.
Automatic setting
With the method, all manually set stations in the band currently selected for reception are replaced with stations in the same band that are automatically selected in order of signal strength. The radio automatically selects 6 stations in the FM band (FM3 station only) and 6 stations each in the MW and LW band. Follow the steps described below. 1. With the radio mode selected, hold down the AM/FM button (2) for 2 seconds or longer. The 6 stations with the best signal strength will automatically be assigned to the memory select buttons (3), with the lowest-frequency station being assigned to the lowest-number button. 2. When you subsequently press a memory select button to select a channel number, the radio will begin receiving the station assigned to that number.
NOTE:
● If you press the AM/FM button (2) for 2 seconds or longer while tuning in the
FM1 or FM2 band, the radio will automatically switch to the FM3 band, where the
automatic seeking/storing will be activated.
Radio data system (RDS)
1- PWR (Power ON/OFF) switch . 8- SEEK (Down-seek) button. 2- AM/FM (FM/MW/LW selection ) button. 9- CT (Clock time) indicator. 3- Memory select buttons. 10- RDS (Radio data system) indicator. 4- TP (Traffic programme) button. 11- TP (Traffic programme identification) indicator. 5- PTY (Programme type) button. 12- PTY (Programme type) indicator. 6- TUNE switch. 13- REG (Regional programme) indicator. 7- SEEK (Up-seek) button. 14- Display.
RDS uses PI (programme identification) signal and AF (alternative frequency) list transmitted in addition to the normal FM broadcasting programmes, and picks up the FM stations that are transmitting the same programme from the AF list and automatically tunes to the station with the strongest signal intensity. Therefore, you can continue listening to one programme in, for example, a long distance driving without retuning to the other station transmitting the same programme when you are leaving the service area of the currently receiving station. The RDS radio also features the limited reception of the programme types, the break-in reception of the traffic announcement to the EON (enhanced other network) and emergency broadcast, and the limited/unlimited reception of the regional programmes.
AF (Alternative Frequencies) function
The AF function finds a station broadcasting the same programme and selects the station with the strongest signal of AF lists. The AF function is turned on at all times unless you manually switch it off. The AF function can be turned ON and OFF. Refer to “Function setup mode” on page 5-29.
CT (Clock Time) function
The clock can be set automatically by using the signal from the local RDS stations. Refer to “Digital clock” on page 5-74.
REG (Regional) function
REG function limits to receive the stations broadcasting regional programmes. Regional programming and regional networks are organised differently depending on the country or area (they may be changed according to the hour, state, or broadcast area), so if you don’t want to receive the regional programmes automatically, you can set up REG ON not to receive regional programmes. The REG function can be turned ON and OFF. Refer to “Function setup mode” on page 5-29.
PI (Programme identification) search function
When travelling long distance and the recalled preset station is weak, the radio searches another frequency broadcasting the same programming with the same PI code in AF list. If there are no frequencies broadcasting the same programming, the radio searches a frequency broadcasting the regional programming. The radio succeeds in searching the regional programming, then the display shows the REG indicator (13). If the radio does not succeed in searching the regional programming, the radio returns to the recalled preset station. If the radio does not succeed in searching the regional programming, the radio returns to the recalled preset station.
PTY (Programme type)
RDS broadcasts are classified according to programme type (PTY) as follows. Use the TUNE switch (6) to select your desired PTY.
1. NEWS. 2. AFFAIRS (Current affairs). 3. INFO (Information). 4. SPORT. 5. EDUCATE (Education). 6. DRAMA. 7. CULTURE. 8. SCIENCE. 9. VARIED. 10. POP M (Pop music). 11. ROCK M (Rock music). 12. EASY M (Easy music). 13. LIGHT M (Light classics). 14. CLASSICS. 15. OTHER M (Other music). 16. WEATHER (Weather information). 17. FINANCE. 18. CHILDREN. 19. SOCIAL. 20. RELIGION. 21. PHONE IN. 22. TRAVEL. 23. LEISURE. 24. JAZZ. 25. COUNTRY. 26. NATION M (National music). 27. OLDIES. 28. FOLK M (Folk music). 29. DOCUMENT.
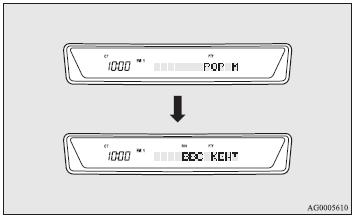
To search for a broadcast of the desired programme type: 1. Press the PTY button (5). 2. Turn the TUNE switch (6) or press a memory select button (3) to select your desired PTY. 3. Two seconds after a desired PTY has been selected, the radio will begin to search for a broadcast of your selected PTY. During search, the selected PTY on the display blinks. 4. When the radio picks up a station with your desired PTY, the display will show the name of the station.
NOTE:
● If the SEEK button (7 to 8) is pressed, the radio will try to find out another
broadcast of the same programme type as currently selected.
● If no station is found with your desired PTY, the display will show ‚ÄúEMPTY‚Äù for
about 5 seconds and the radio will return to the previous station.
How to enter PTYs in the memory
As many as 6 PTYs can be entered in the memory. Follow the steps described below. 1. Press either the TUNE switch (6) to tune the PTY to be entered in the memory. 2. Press one of the memory select buttons (3) for 2 seconds or longer. The sound will be momentarily interrupted while the PTY is being entered into the memory. The number of the button corresponding to the entry into the memory and the PTY are displayed. 3. The preset memory setting is retrieved by pressing the button and then releasing it within about 2 seconds.
To change the language of PTY display
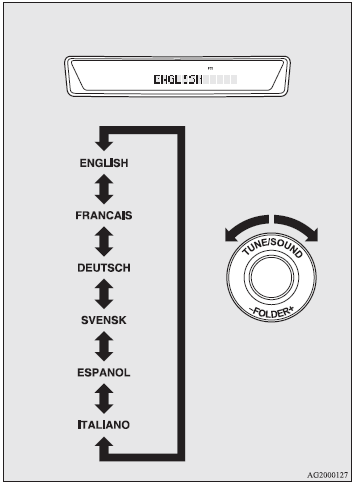
You can select your favourite language among English, French, German, Swedish, Spanish and Italian. 1. Press the TUNE switch (6) for 2 seconds or longer to select the language of PTY display mode. Refer to “Function setup mode” on page 5-29. 2. Turn the TUNE switch (6) to select a language.
NOTE:
● After selecting a mode, you can leave the function setup mode by taking either
of the following steps: • Press the TUNE switch (6) for at least 2 seconds. • Make
no entry for 10 seconds.
Traffic information
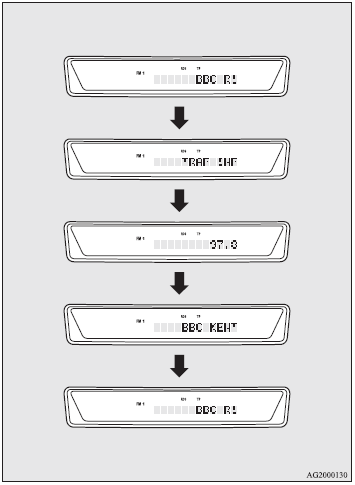
The radio will automatically tune in to traffic information broadcasts while receiving FM broadcasts or playing compact discs. To select this function. follow the instructions below. 1. Press the TP button (4). The display will show “TP” (11). If the RDS data can be read, the display will show “RDS” (10). If not, the display will show “NO RDS” for about 5 seconds. 2. If the radio detects traffic information on either the station currently selected or another station, the display will show “TRAF INF” for 5 seconds followed by a 2-second indication of the frequency. Then, it will show the name of the station broadcasting the traffic information to which you will listen. The volume level is set separately for listening to normal audio programmes and for listening to traffic information. The volume level will therefore change automatically to that set when traffic information was last received. When the traffic information broadcast is over, the radio will return to the previously received programme and to the corresponding volume level. 3. Press the TP button (4) to return to the previous condition.
NOTE:
● While ‚ÄúTP‚Äù is illuminated, the radio stops only at TP stations, even if the TUNE
switch (6) is turned.
TP (Traffic information Programme) search function
The traffic information programme standby function is turned on (with the TP indicator (11) shown on the display) and after about 45 seconds since the RDS indicator (10) turns off due to weak signal or the tuning station is changed over from a TP station to a station which does not broadcast traffic information, the sound will beep 5 times and seeks out a TP station in all frequencies automatically. The TP search function can be turned ON and OFF. Refer to “Function setup mode” on page 5-29.
Emergency broadcasts
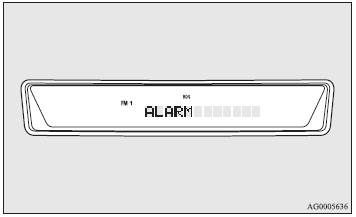
If an emergency broadcast is caught while receiving a FM broadcast or playing back a compact disc with the ignition switch in “ACC” or “ON” position, the display will show “ALARM” and the emergency broadcast will interrupt the current programme. The volume level is set separately for listening to normal audio programmes and for listening to emergency broadcasts. The volume level will therefore change automatically to that set when an emergency broadcast or traffic information broadcast was last received. When the emergency broadcast is over, the radio will return to the previously received programme and to the corresponding volume level.
Function setup mode
It is possible to change the following functions:
● AF.
● CT.
● REG.
● TP-S.
● Language of PTY display.
● SCV.
1. Press the TUNE switch (6) for 2 seconds or longer to select the function setup mode.
2. Press the TUNE switch (6) repeatedly to select the mode you wish to change. The order is: AF → CT → REG → TP-S → Language of PTY display → SCV → PHONE → Function setup mode OFF.
NOTE:
● Although ‚ÄúPHONE‚Äù appears on the display, the PHONE function is inoperative.

3. Select the desired setting for each mode to be turned ON and OFF as shown below. The setting will be shown on the display.
NOTE:
● After selecting a mode, you can leave the function setup mode by taking either
of the following steps: • Press the TUNE switch (6) for at least 2 seconds. • Make
no entry for 10 seconds.
● For instructions on setting the language of PTY display, refer to ‚ÄúTo change the
language of PTY display” on page 5-26.
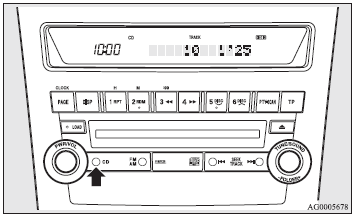
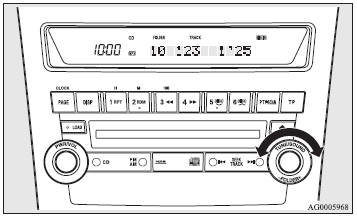
CD control panel and display
1- AM/FM button. 13- FOLDER switch. 2- CD (CD mode changeover) button. 14-
 (Track up) button. 3- PWR (Power ON/OFF)
switch. 15-
(Track up) button. 3- PWR (Power ON/OFF)
switch. 15-  (Track down) button. 4-
PAGE (Title scroll) button. 16- CD indicator. 5- DISP (Display) button. 17- FOLDER
indicator. 6- RPT (Repeat mode) button. 18- TRACK (Track number) indicator. 7- RDM
(Random mode) button. 19- TAG (Tag) indicator. 8-
(Track down) button. 4-
PAGE (Title scroll) button. 16- CD indicator. 5- DISP (Display) button. 17- FOLDER
indicator. 6- RPT (Repeat mode) button. 18- TRACK (Track number) indicator. 7- RDM
(Random mode) button. 19- TAG (Tag) indicator. 8-
 (Fast-reverse) button. 20- RPT (Repeat)
indicator. 9-
(Fast-reverse) button. 20- RPT (Repeat)
indicator. 9-  (Fast-forward) button.
21- RDM (Random) indicator. 10- SCAN button. 22- Display. 11- Eject button. 23-
D-RPT indicator. 12- CD insertion slot. 24- D-RDM indicator.
(Fast-forward) button.
21- RDM (Random) indicator. 10- SCAN button. 22- Display. 11- Eject button. 23-
D-RPT indicator. 12- CD insertion slot. 24- D-RDM indicator.
To listen to a CD
1. Insert the disc with the label facing up. When a disc is inserted, the CD indicator (16) will come on and the CD player will begin playing even if the radio is being used. The CD player will also start playback when the CD button (2) is pressed with a disc in the player or with a disc set in the CD insertion slot (12), even if the radio is being used. 2. To stop the CD, turn off the power by pressing the PWR switch (3), or change over to the radio mode by pressing the AM/FM button (1), or eject the disc by pressing the eject button (11).
NOTE:
● To adjust the volume and tone, refer to ‚ÄúTo adjust the volume‚Äù on page 5-17 and
“To adjust the tone” on page 5-17.
● When an 8 cm compact disc is used, the adapter is not needed for playback. Insert
the disc in the centre of the disc-loading slot.
● For information concerning the handling of compact discs, refer to ‚ÄúHandling of
compact discs” on page 5-70.
To listen to a music CD
Push the CD button (2) if a disc is already in the CD player. The audio system will enter CD mode and start playback. The track number and the playing-time will appear on the display. The tracks in the disc will be played consecutively and continuously.
To listen to an MP3 CD
This CD player allows you to play MP3 (MPEG Audio Layer- 3) files recorded on CD-ROMs, CD-Rs (recordable CDs), and CD-RWs (rewritable CDs) in ISO9660 Level 1/Level 2, Joliet, and Romeo formats. Each disc can hold up to 255 files in up to 100 folders, up to a maximum of 16 levels. The ID3 tag information (version 1) can be displayed during MP3 playback. For information concerning ID3 tags, refer to “CD text and MP3 title display” on page 5-38.

Push the CD button (2) if a disc is already in the CD player. The display shows “READING”, then playback will begin. The folder number, the track number, the playing-time, and MP3 indicator will appear on the display.
NOTE:
● While listening to a disc on which CD-DA (CD-Digital Audio) and MP3 files have
both been recorded, you can switch between reading of the CD-DA and reading of the
MP3 files by pressing the CD button for 2 seconds or longer (until you hear a beep).
● With a disc that contains both CD-DA and MP3 files, the CD-DA files are automatically
played first.
● The playback sound quality differs depending on the encoder software and the bit
rate. For more information, refer to the owner’s manual for the encoder software.
● Depending on the layout of the files and folders on the disc, it may take some
time until playback starts.
● MP3 conversion software and writing software are not supplied to this unit.
● You may encounter trouble in playing an MP3 or displaying the information of MP3
files recorded with certain writing software or CD recorders (CD-R/RW drivers).
● If you write many folders or files other than MP3 files, it may take some time
until playback starts.
● This unit does not record MP3 files.
● For information on CD-Rs/RWs, refer to ‚ÄúNotes on CDRs/ RWs‚Äù on page 5-72.
CAUTION:
● Attempting to play a file not in the MP3 format that has the ‚Äú.mp3‚Äù file extension
may produce noise from the speakers and speaker damage, and can significantly damage
your hearing.
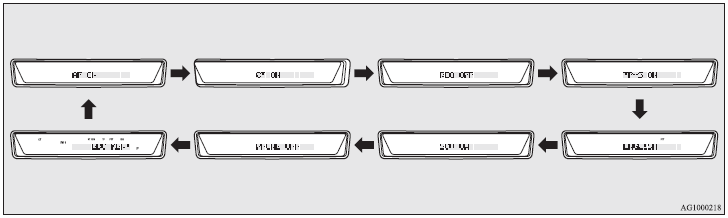
Folder selection order/MP3 file playback order (Example)
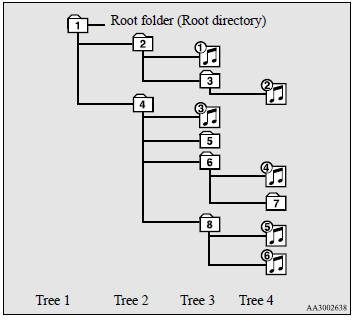
Folder selection in the order
File selection in the order
To fast-forward/reverse the disc
Fast-forward
The disc is fast-forwarded while the button
(9) is held down. Playback will begin once the button is released.
button
(9) is held down. Playback will begin once the button is released.
Fast-reverse
The disc is fast-reversed while the button
(8) is held down. Playback will begin once the button is released.
button
(8) is held down. Playback will begin once the button is released.
To select a desired folder (MP3 CDs only)
You can select your desired folder by turning the FOLDER switch (13).
Folder up
Turn the FOLDER switch (13) clockwise until the desired folder number appears on the display.
Folder down
Turn the FOLDER switch (13) anticlockwise until the desired folder number appears on the display.
To select a desired track
You can cue tracks on a disc by using the or
or button
(15 or 14).
button
(15 or 14).
Track up
The disc will skip as many songs as the number of times the button(14)
is pushed. The display window will display the track number of the track selected.
Track down
The disc will skip as many songs as the number of times the buttonis
pushed. The display window will display the track number of the track selected.
To repeat tracks
To repeat a track
Press the RPT button (6) to repeat the same track. If the RPT button is pressed, the RPT indicator (20) will come on. To exit this mode, press the button again.
To repeat songs in the same folder (MP3 CDs only)
While a song is playing, press the RPT button (6) for 2 seconds or longer (until you hear a beep). The D-RPT indicator (23) will come on and the disc will repeat all the songs in the folder that contains the song currently playing. To exit this mode, press the button again.
NOTE:
● With a disc that contains both CD-DA and MP3 files, the repeat mode causes only
files of the same format (CD-DA only or MP3 files only) to be repeated.
To change track playback order
Random playback for a disc (music CDs only)
If the RDM button (7) is pressed, the RDM indicator (21) will come on and the tracks that are played will be selected at random. To exit this mode, press the button again.
Random playback for a folder (MP3 CDs only)
If the RDM button (2) is pressed, the RDM indicator (21) will come on and the tracks that are played will be selected at random from the folder that is currently selected. To exit this mode, press the button again.
Random playback for all folders on a disc (MP3 CDs only)
Press the RDM button (7) for 2 seconds or longer (until you hear a beep). The D-RDM indicator (24) will come on and the tracks that are played will be selected at random from all folders on the disc. To exit this mode, press the button again.
NOTE:
● With a disc that contains both CD-DA and MP3 files, the random mode causes only
files of the same format (CDDA only or MP3 files only) to be played in a random
sequence.
To find the start of each track on a disc for playback
Press the SCAN button (10). “SCAN” will appear on the display (22) and the CD player will play back the first 10 seconds of each track on the disc. The track number will blink while the scan mode is selected. To exit this mode, press the button again.
NOTE:
● Once all tracks on the disc have been scanned, playback of the disc will restart
from the beginning of the track that was playing when scanning started.
● The scan mode will be cancelled when radio or CD operation is selected.
● With a disc that contains both CD-DA and MP3 files, the scan mode causes only
files of the same format (CD-DA only or MP3 files only) to be played.
To eject discs
When the eject button (11) is pressed, the disc automatically stops and is ejected. The system automatically switches to radio mode.
NOTE:
● If you do not remove an ejected disc before 15 seconds have elapsed, the disc
will be reloaded.
CD text and MP3 title display
This CD player can display CD text and MP3 titles, including ID3 tag information (version 1).
CD text
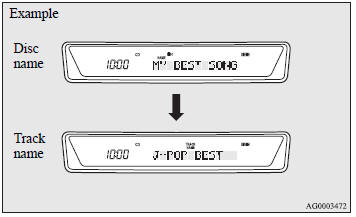
The CD player can display disc and track titles for discs with converted disc and track title information. Press the DISP button (5) repeatedly to make selections in the following sequence: disc name → track name → normal display mode.
NOTE:
● The display can show up to 12 characters. If a disc name or track name has more
than 12 characters, press the PAGE button (4) to view the next 12 characters.
● When there is no title information to be displayed, the display shows ‚ÄúNO TITLE‚Äù.
● Characters that the CD player cannot display are shown as .
.
MP3 titles
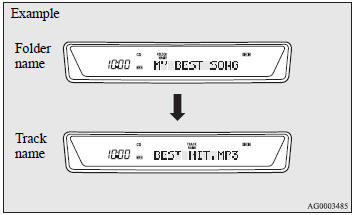
The CD player can display folder and track titles for discs with converted folder and track information. Press the DISP button (5) repeatedly to make selections in the following sequence: folder name → track name → normal display mode.
ID3 tag information
The CD player can display ID3 tag information (version 1) for files that have been recorded with ID3 tag information. 1. Press the DISP button (5) for 2 seconds or longer to switch to the ID3 tag information. The TAG indicator (19) will appear on the display. 2. Press the DISP button repeatedly to make selections in the following sequence: album name → track name → artist name → normal display mode.
NOTE:
● To return from ID3 tag information to the folder name, press the DISP button again
for 2 seconds or longer.
● When there is no title information to be displayed, the display shows ‚ÄúNO TITLE‚Äù.
● The display can show up to 12 characters. If a folder name, track name, or item
of ID3 tag information has more than 12 characters, press the PAGE button (4) to
view the next 12 characters.
● Folder names and track names can each be displayed up to a length of 32 characters.
Items of ID3 tag information can each be displayed up to a length of 30 characters.
● Characters that the CD player cannot display are shown as.
 Air purifier
An air filter has been incorporated into this air conditioning so that pollen
and dust are cleaned from the air. Replace the air filter periodically as its ability
to clean the air will be reduced ...
 LW/MW/FM digital tuning radio with CD changer*
The audio system can only be used when the ignition switch is in the “ON” or
“ACC” position.
NOTE:
● When listening to the audio system with the engine stopped, be sure to turn the ...
See also:
Trailer hitches
Never drill the frame or under-body
of your vehicle to install a commercial
trailer hitch. If you do, dangerous
exhaust gas, water or mud may
enter the passenger compartment
through the ...
Heated Mirrors
For vehicles with heated mirrors:
The heated outside rearview mirrors turn on when the rear window defogger is
on and help to clear fog or frost from the surface of the mirrors.
(Rear Window Defo ...
Maintenance Minder
The information display in the
instrument panel shows you the
engine oil life and maintenance
service items when the ignition
switch is in the ON (II) position. This
information helps to kee ...