 Mercedes-Benz GLK-Class: Warning displays
The warning displays show the distance between the sensors and the obstacle. The warning display for the front area is located on the dashboard above the center air vents. The warning display for the rear area is located on the headliner in the rear compartment.
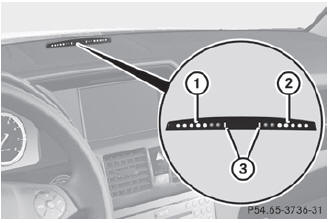
Warning display for the front area
- Segments on the left-hand side of the vehicle
- Segments on the right-hand side of the vehicle
- Segments showing operational readiness
The warning display for each side of the vehicle is divided into five yellow and two red segments. PARKTRONIC is operational if yellow segments showing operational readiness 3 light up.
The selected transmission position determines which warning display is active when the engine is running.
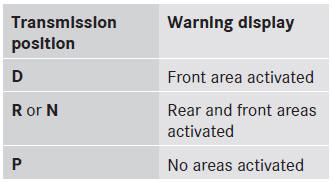
One or more segments light up as the vehicle approaches an obstacle, depending on the vehicle's distance from the obstacle. From the:
- sixth segment onwards, you will hear an intermittent warning tone for approximately two seconds.
- seventh segment onwards, you will hear a warning tone for approximately two seconds. This indicates that you have now reached the minimum distance.
 Range of the sensors
General notes
The sensors must be free of dirt, ice and slush; otherwise they may not function
correctly. Clean the sensors regularly, taking care not to scratch or damage them
().
Side view
...
 Deactivating/activating PARKTRONIC
To deactivate/activate PARKTRONIC
Indicator lamp
If indicator lamp 2 lights up, PARKTRONIC is deactivated.
PARKTRONIC is automatically activated when you turn the SmartKey to position
...
See also:
Playing the Radio
For vehicles equipped with the MyLink or IntelliLink infotainment system, see
the separate MyLink/ IntelliLink Features and Functions Guide for more information.
Audio Source
VOL/ (Power/Volume): ...
Kick-down
Push the accelerator pedal fully down to
achieve rapid acceleration in automatic mode.
When the pedal is relaxed, normal gear
changing will resume. ...
Connecting an iPod
1. Open the upper glove box.
2. Push the release button to release
the USB adapter cable.
3. Connect your dock connector to
the iPod correctly and securely.
4. Install the dock connector ...