 Mitsubishi Outlander: Ventilators
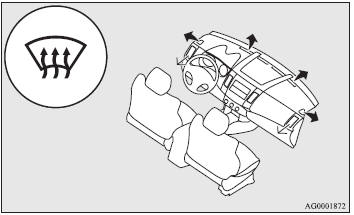
1- Centre ventilators. 2- Side ventilators.
Air flow and direction adjustments
Centre ventilators
Move the knob (A) to adjust the air flow direction. To close the ventilator, fully move the knob (A) to the inner side.
1- Close. 2- Open.
Side ventilators
Move the knob (A) to adjust the air flow direction. To close the ventilator, fully move the knob (A) to the outer side.
1- Close. 2- Open.
NOTE:
● The cool air from the ventilators may appear as a mist. This is due to moist air
being suddenly cooled by the air conditioning. This will clear after a few moments.
● Be careful not to spill drinks, etc., into the ventilators. Doing so might cause
the air conditioning not to function normally.
Mode selection dial
To change the amount of air flowing from the ventilators, turn the mode selection dial.
Changing the mode selection
To change the position and amount of air flowing from the ventilators, turn the
mode selection dial. These symbols are used in the next several illustrations to
demonstrate the quantity of air coming from the ventilators.
 Small amount of air from the ventilators
 Medium amount of air from the ventilators
 Large amount of air from the ventilators
Face position
Air flows only to the upper part of the passenger compartment.
Foot/face position
Air flows to the upper part of the passenger compartment, and flows to the leg area.
NOTE:
● With the mode selection dial between the and
and positions, the air flows mainly to the upper part of the passenger compartment.
With the mode selection dial between the
positions, the air flows mainly to the upper part of the passenger compartment.
With the mode selection dial between the and
and positions,
the air flows mainly to the leg area.
positions,
the air flows mainly to the leg area.
Foot position
Air flows mainly to the leg area.
Foot/demister position
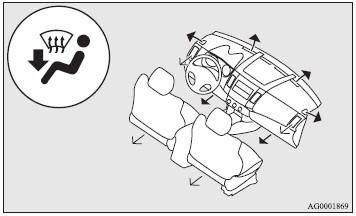
Air flows to the leg area, the windscreen and the door windows.
NOTE:
● With the mode selection dial between the and
and positions, the air flows mainly to the leg area. With the mode selection dial between
the
positions, the air flows mainly to the leg area. With the mode selection dial between
the and
and positions,
the air flows mainly to the windscreen and door windows.
positions,
the air flows mainly to the windscreen and door windows.
Demister position
Air flows mainly to the windscreen and the door windows.

 Automatic air conditioning
The air conditioning can only be used while the engine is running.
Control panel
1- Temperature control dial. 2- Air selection switch. 3- Blower speed selection
dial. 4- Air conditioning switch. ...
See also:
Models With Express Window Feature
Press and release the mirror select button marked L (left)
or R (right) and then press one of the four arrow buttons
to move the mirror in the direction the arrow is pointing.
The selection will ...
Waxing
• Wash the vehicle first.
• Use a quality wax that does not contain abrasives.
• Do not allow paint sealant to come in contact with any non-body
(low-gloss black) colored trim, such as graine ...
Rear window wiper blade assembly
1. Raise the wiper arm off the rear
window.
2. Turn the wiper blade assembly counterclockwise.
3. Pull the wiper blade assembly toward
you to remove it from the wiper arm.
4. Install the wi ...