 Suzuki Grand Vitara: Speedometer/Odometer/Tripmeter/Brightness Control
Speedometer/Odometer/Tripmeter/Brightness
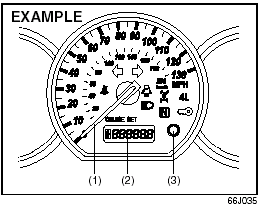
Control (1) Speedometer. (2) Odometer/Tripmeter. (3) Odometer/Tripmeter selector,
Brightness control knob.
Speedometer
The speedometer indicates vehicle speed in km/h and miles/h.
Odometer/Tripmeter
When the ignition switch is turned to “ON”, the display shows the odometer or tripmeter. The odometer records the total distance the vehicle has been driven. The tripmeter can be used to measure the distance traveled on short trips or between fuel stops.
CAUTION: Keep track of your odometer reading and check the maintenance schedule regularly for required services. Increased wear or damage to certain parts can result from failure to perform required services at the proper mileage intervals.
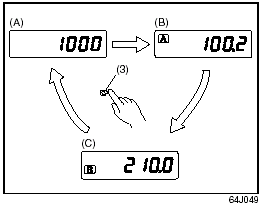
When the ignition switch is turned to the “ON” position, the display shows the odometer or trip meter. The display shows three types of indication; odometer, trip meter A and trip meter B. Push the selector knob (3) quickly to switch the indication among the three. You can use the two trip meters (A and B) independently.
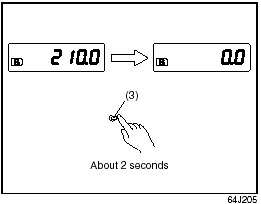
Hold in the selector knob for about 2 seconds to reset the trip meter to zero.

Brightness Control
(3) Brightness control knob (4) In this position, the meter lights are the dimmest
and the other instrument panel lights are turned off. (5) In this position, the
instrument panel lights are the brightest.
Your vehicle has a system to automatically dim the instrument panel lights when the ignition switch is in the “ON” position and the lighting switch is either (a) turned to the second or third position, or (b) turned to the “AUTO” position and it is dark around the light sensor. The level of brightness depends on the position of the brightness control knob (3). To reduce the brightness and activate the automatic dimming feature, turn the knob (3) counterclockwise. When the knob (3) is turned counterclockwise to position (4), the meter brightness becomes dimmest and the other instrument panel lights are turned off. To brighten the instrument panel lights, turn the knob (3) clockwise. To cancel the automatic dimming feature and maintain full brightness, turn the knob (3) clockwise to position (5).
 A/T Selector Position Indicator (if equipped)
A/T Selector
Position Indicator (if equipped)
When the ignition switch is in the “ON” position, this indicator shows the selector
position of automatic transmission. ...
 Tachometer
Tachometer
The tachometer indicates engine speed in revolutions per minute.
CAUTION: Never drive with the engine speed indicator in the red zone or severe
engine damage can result. ...
See also:
Using a Booster Seat
A child who has outgrown a forwardfacing
child seat should ride in a
back seat and use a booster seat
until the lap/shoulder belt fits them
properly without the booster.
Some states, Cana ...
Change Engine Oil
The oil change indicator system will remind you that it is
time to take your vehicle in for scheduled maintenance.
Refer to the “Maintenance Schedule” for further information.
NOTE: Under no c ...
Messages
Park brake not fully released – A fault is preventing
the parking brake from being released.
Try to apply the parking brake and release it
several times. If the problem persists, contact an a ...