Honda CR-V: Replacing the Transmitter Battery
If it takes several pushes on the button to lock or unlock the doors and the tailgate, replace the battery as soon as possible.
Battery type: CR1616
To replace the battery:
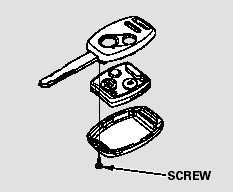
1. Remove the screw at the base of the transmitter with a small Phillips-head screwdriver.
NOTE: Be careful when removing this screw as the head of the screw can strip out.
2. Separate the transmitter by prying its middle seam with your fingernail.
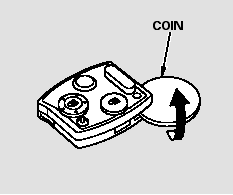
3. Inside the transmitter, separate the inner cover from the keypad by carefully prying on the edge with a coin.
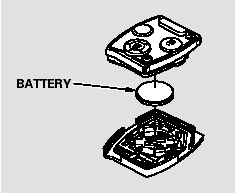
4. Remove the old battery and note the polarity. Make sure the polarity of the new battery is the same (+ side facing down), then insert it in the keypad.
An improperly disposed of battery can hurt the environment.
Always confirm local regulations for battery disposal.
5. Install the parts in reverse order.
As required by the FCC:
This device complies with Part 15 of the FCC rules. Operation is subject to the following two conditions: (1) This device may not cause harmful interference, and (2) this device must accept any interference received, including interference that may cause undesired operation.
Changes or modifications not expressly approved by the party responsible for compliance could void the user’s authority to operate the equipment.
This device complies with Industry Canada Standard RSS-210.
Operation is subject to the following two conditions: (1) this device may not cause interference, and (2) this device must accept any interference that may cause undesired operation of the device.
READ NEXT:
 Tailgate
The tailgate will lock when you lock
the driver’s door with the key, the
remote transmitter, the master door
lock switch, or the lock tab on the
driver’s door.
To unlock the tailgate, tur
Unlocking the Tailgate
If the power door lock system cannot
unlock the tailgate, unlock it
manually.
Place a cloth on the top side of the
cover to prevent scratches, then use
a small flat-tip screwdriver to rem
SEE MORE:
Sound Quality Diagnosis
Special Tools Required
Diagnostics CD 07AAZ-SDBA100
Use the following tests to check sound quality.
NOTE: Before beginning the following tests, write down
the customer's bass, treble, fader and balance settings,
and then set them to their center positions for testing.
Left/Right Channel 10
Do this
Adjusting the Sound
You can adjust the sound on the
navigation screen. To adjust the
sound, push the AUDIO button, then
enter the sound grid by touching the
SOUNDicon on the display.
BASS - Adjusts the bass.
TREBLE - Adjusts the treble. To
adjust the treble and bass, touch
either
or
on the tr
