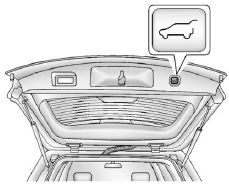
 GMC Terrain: Power Liftgate
On vehicles with a power liftgate, the vehicle must be in P (Park) to operate. The taillamps flash when the power liftgate moves.
WARNING
You or others could be injured if caught in the path of the power liftgate. Make sure there is no one in the way of the liftgate as it is opening and closing.
The power liftgate has three modes of operation. Mode selection is controlled by the interior mode switch.
Choose the power liftgate mode by turning the dial on the switch until the indicator lines up with the desired position. The vehicle must be in P (Park).
The three modes are:
MAX: The liftgate power opens to the full open height.
3/4: The liftgate power opens to a reduced open height that can be set by the vehicle operator. Use this setting to prevent the liftgate from opening into overhead obstructions such as a garage door or roof mounted cargo during power operation. The liftgate can still be fully opened manually.
OFF: The liftgate only operates manually in this position. Manual operation of a liftgate that also has power operation requires more effort than a standard manual liftgate.
In either the MAX or the 3/4 mode, the liftgate can be power opened and closed by:
○ First pressing  and then pressing
and holding
  on the RKE transmitter
until the liftgate starts moving. See Remote Keyless Entry (RKE) System Operation
on page 2‑3.
○ Pressing the power liftgate button in the center of the mode switch on the overhead console, with the driver door unlocked.
○ Pressing the touch pad switch on the liftgate outside handle, with all doors unlocked, to open the liftgate.

Press and release  on the liftgate
adjacent to the latch to close the liftgate.
Pressing any button, or the touch pad switch, while the liftgate is moving stops it. Pressing the button or RKE transmitter again reverses the direction. The touch pad switch will stop the liftgate from moving. There is a minimum distance that the power liftgate must already be open for the system to hold it open. If movement is stopped below that minimum, the liftgate closes.
Do not force the liftgate open or closed during a power cycle.
The power liftgate may be temporarily disabled under extreme temperatures or low battery conditions. If this occurs, the liftgate can still be operated manually.
If the vehicle is shifted out of P (Park) while the power function is in progress, the liftgate power function will continue to completion. If the vehicle is shifted out of P (Park) and accelerated before the power liftgate latch is closed, the liftgate may reverse to the open position. Cargo could fall out of the vehicle. Always make sure the power liftgate is closed and latched before driving away.
If the liftgate is power opened and the liftgate support struts have lost pressure, the turn signals flash and a chime will sound. The liftgate stays open temporarily, and then slowly closes. See a dealer for service before using the liftgate.
 Manual Liftgate
To unlock the liftgate, press the power door lock switch or press " on the Remote
Keyless Entry (RKE) transmitter twice. See Remote Keyless Entry (RKE) System Operation
on page 2‑3. To ...
 Obstacle Detection Features
If the liftgate encounters an obstacle during a power open or close cycle, a
warning chime will sound and the liftgate will automatically reverse direction to
the full closed or open position. Aft ...
See also:
Adjustable level of each mode
*: For type A and B audio, AUX volume can be adjusted only when an AUX audio
product is connected. ...
Supported Medium Formats (File Systems)
The medium formats supported by the radio are ISO 9660
Level 1 and Level 2 and includes the Joliet extension.
When reading discs recorded using formats other than
ISO 9660 Level 1 and Level 2, th ...
Manual tuning
Turn the “TUNE/TRACK/CH” dial clockwise
to increase the tuning frequency and
turn the “TUNE/TRACK/CH” dial counterclockwise
to decrease it.
Each time the dial is turned, the frequency ...
