Range Rover Evoque: Navigation controls
Consists of two menu screens. Icons for the second menu are shown individually.
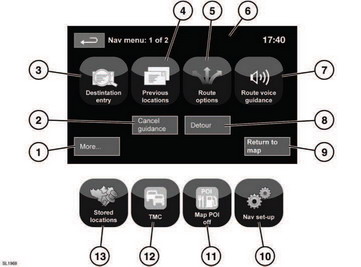
Navigation controls
See 104, TOUCH SCREEN OVERVIEW.
1. Move to other Navigation menu.
2. Cancels current route guidance.
3. Provides a choice of options for entering a destination.
4. Will display previous destinations entered.
5. Allows the user to select various options for the route.
6. When a destination is set, the Range Rover logo in this position is replaced by a soft key which enables the last voice instruction to be repeated.
7. Voice guidance can be turned off for the current journey. Softkey is highlighted while voice guidance is enabled.
8. Allows the user to take a detour from the current route.
9. Advances to the main map screen.
10. Settings for the navigation system.
11. Allows the user to turn on or off POI icons.
12. TMC (Traffic Message Channel). Not used for entering a destination but, when enabled, will provide data about road conditions and any events that may affect the journey.
13. Manage the stored locations.
READ NEXT:
 Map split screen
Map split screen
1. TMC (Traffic Message Channel)
information.
2. North is up.
3. Small compass display which always
indicates North.
4. Next direction display.
5. Current vehicle position.
Screen modes
Touch the screen mode selection button (12)
to view a series of icons, each depicting a
different screen mode (as detailed below).
Touch the relevant icon to select the desired
screen mode.
Ful
Search area
The navigation map database is divided into
countries, or geographically defined areas
within countries, called search areas. When
setting a route, the destination (or waypoint)
entered must be in
SEE MORE:
Starting System - GTDi 2.0L Petrol
Starting System - Component
Location
COMPONENT LOCATION
Solenoid
12V supply from battery
Solenoid power supply from Battery Junction Box (BJB)
Starter motor
Pinion gear
Starting System - Overview
OVERVIEW
The starter motor is rated as 1.3 kW and is a Denso conventional design with
the motor
Engine Oil Draining and Filling, Camshafts
Engine Oil Draining and Filling
Draining
NOTE: Removal steps in this procedure may contain installation details.
1. WARNING: Make sure to support the vehicle with axle stands.
Raise and support the vehicle.
2. Remove the engine undershield.
Refer to: Engine Undershield (501-02 Front End Body Panels
