 Suzuki Grand Vitara: Information Display
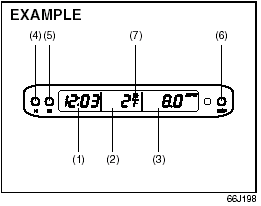
Information Display
(1) Clock. (2) Thermometer. (3) Instantaneous fuel consumption/Average fuel
consumption/Driving range. (4) “H” button. (5) “M” button. (6) “DISP” button. (7)
Freezing mark.
Clock (1)
The clock is shown when the ignition switch is in the “ACC” or “ON” position.
To set the clock, follow the instructions below.
• To set the hour display, push the “H” button (4) repeatedly to advance the hour
display. To advance the hour display quickly, hold in the “H” button (4) for about
1 second and continue holding.
• To set the minute display, push the “M” button (5) repeatedly to advance the minute
display. To advance the minute display quickly, hold in the “M” button (5) for about
1 second and continue holding.
Thermometer (2)
The thermometer shows the outside temperature when the ignition switch is in the “ON” position. If the outside temperature nears freezing, the mark (7) will come on when the display shows the outside temperature.
NOTE: The thermometer will not indicate the actual outside temperature when driving at low speed, or when stopped.
You can change the unit indication of the thermometer between °F and °C. To change the indication, follow the instructions below.
1) If the fuel consumption/driving range display is blank, push the “DISP” button (6) to turn on the display. 2) Turn the ignition switch to the “LOCK” position. 3) Turn the ignition switch to the “ACC” or “ON” position while holding in the “DISP” button (6). The unit display of the thermometer will blink.
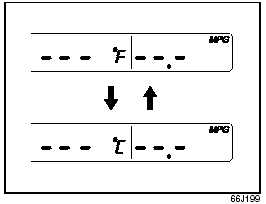
4) Push the “DISP” button (6) quickly to change the indication between °F and °C as shown in the illustration. 5) Hold in the “DISP” button (6) for more than 2 seconds, and the unit indication will stop blinking. If you don’t push the “DISP” button (6) within about 8 seconds after the unit display starts blinking, the unit display will automatically stop blinking.
NOTE: The unit indication of the thermometer can not be changed when the fuel consumption/ driving range display is blank. Refer to “Fuel Consumption and Driving Range (3)” in this section.
Fuel Consumption and Driving Range (3)
This display can be changed to show instantaneous fuel consumption, average fuel consumption, driving range. Also, the display of fuel consumption can be turned off if you desire.
Every time you push the “DISP” button (6), the display will be changed among the following four displays.
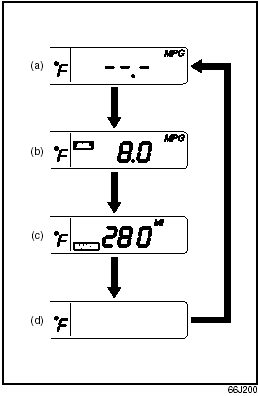 (a) Instantaneous
fuel consumption (b) Average fuel consumption (c) Driving range (d) No display
Instantaneous fuel consumption (a)
If you selected instantaneous fuel consumption the last time you drove the vehicle, the display indicates “--.-” when the ignition switch is turned to the “ACC” or “ON” position. Unless the vehicle is moving, the display will indicate “--.-”.
Average fuel consumption (b)
If you selected average fuel consumption the last time you drove the vehicle, the display shows the last value of average fuel consumption when the ignition switch is turned to the “ACC” or “ON” position. Unless you reset the value of average fuel consumption, the display will show the value of average fuel consumption which includes average fuel consumption during previous driving. To reset the value of average fuel consumption, hold in the “DISP” button (6) for more than 2 seconds when the display shows an average fuel consumption value. The display will indicate “--.-” and then will show a new average fuel consumption value after driving for a short time.
Driving range (c)
If you selected driving range the last time you drove the vehicle, the display shows “-- .-” for a few seconds and then shows the current driving range when the ignition switch is turned to the “ON” position. The driving range shown in the display is the approximate distance you can drive until the fuel gauge indicates “E” based a current driving conditions. When the remaining fuel in fuel tank reaches a low level, the display “--.-” will appear. If the low fuel warning light comes on, fill the fuel tank immediately regardless of the value of driving range shown in the display. As the driving range after refueling is calculated based on the last driving condition, the value is different each time you refuel.
NOTE:
• When you reconnect the negative (–) terminal to the battery, the value of driving
range will be shown after driving for a while.
• For new vehicle with low mileage, the driving range may not be shown promptly
in the display when beginning to drive. The driving range will be shown after a
while.
NOTE: The values of fuel consumption and driving range shown in the display
are affected by conditions such as the following;
• road condition.
• surrounding traffic condition.
• driving condition.
• vehicle condition.
• when the malfunction indicator light comes on or blinks.
Unit indication of fuel consumption and driving range
You can change the unit indication of fuel consumption when selecting instantaneous fuel consumption or average fuel consumption in the display. You can also change the unit indication of driving range when selecting driving range in the display. To change the unit indication in the display, follow the instructions below. You should operate the display before the vehicle moves. 1) If the fuel consumption/driving range display is blank, push the “DISP” button (6) to turn on the display. 2) Turn the ignition switch to the “LOCK” position. 3) Turn the ignition switch to the “ACC” or “ON” position while holding in the “DISP” button (6). The unit display of the thermometer will blink. 4) Push the “M” button (5), and the unit display of fuel consumption or driving range will blink.
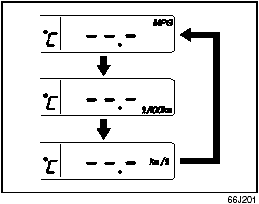
Fuel consumption
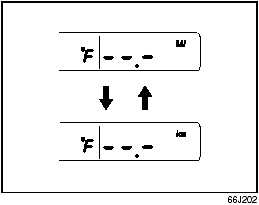
Driving range
5) Push the “DISP” button (6) quickly to change the display as shown in the above illustrations. 6) Push the “DISP” button (6) for more than 2 seconds, and the unit display will stop blinking and the display will stay on. If you don’t push the “DISP” button (6) within about 8 seconds, the unit display will automatically stop blinking and the display will stay on.
NOTE: The unit indication of the fuel consumption or driving range can not be changed when the fuel consumption/driving range display is blank.
NOTE: “MPG” is based on US gallons.
NOTE: When you reconnect the negative (–) terminal to the battery, the information display will be reinitialized. Readjust the display. If you select driving range, the display will be shown after driving for a while.
 Glove Box
Glove Box
To open the glove box, pull the latch lever. To close it, push the lid until
it latches securely. If a lock is equipped on the latch lever, lock the glove box
by inserting the key and ...
 Theft Deterrent Light
Theft Deterrent
Light
This light will blink with the ignition switch in the “OFF” or “ACC” position.
The blinking light is intended to deter theft by leading others to believe that
the ...
See also:
Retained Accessory Power (RAP)
These vehicle accessories can be used for up to 10 minutes after the engine is
turned off:
○ Audio System
○ Power Windows
○ Sunroof (if equipped)
Power to the audio system will ...
Operating the automatic transaxle
The highly efficient Hyundai automatic transaxle
has four forward speeds and one reverse
speed. The individual speeds are selected automatically,
depending on the position of the
speed selec ...
Corrosion protection
Refer to “Corrosion protection”. ...
