 Mitsubishi Outlander: How to change a tyre
Before changing a tyre, first stop your vehicle in a safe, flat location. 1. Park the vehicle on level and stable ground, free of loose pebbles, etc.. 2. Set the parking brake firmly. 3. Turn the ignition key to the “LOCK” position, move the gearshift lever to the “R” (Reverse) position. 4. Turn on the hazard flashers and set up a warning triangle, flashing signal lamp, etc., at an adequate distance from the vehicle, and have all your passengers leave the vehicle.
NOTE:
● The warning triangle and flashing signal lamp does not come with your vehicle.
It is recommended that you keep one in the vehicle for use if needed.

5. To prevent the vehicle from rolling when it is raised on the jack, place chocks or blocks (A) in front of and behind the tyre that is diagonally opposite from the tyre (B) you are changing.
WARNING:
● Be sure to apply chocks to the correct tyre when jacking up the vehicle. If the
vehicle moves while jacked up, the jack could slip out of position, leading to an
accident.
NOTE:
● The chocks shown in the illustration do not come with your vehicle. It is recommended
that you keep ones in the vehicle for use if needed.
● If chocks are not available, use a stone or any other object that is large enough
to hold the wheel in position. 6. Get the spare wheel, jack, and wheel nut wrench
ready. Refer to “Tools and jack” on page 6-9.
Spare wheel information
Check the air pressure of the spare tyre frequently and make sure it is ready for emergency use at any time. Maintaining the spare wheel at the highest specified air pressure will ensure that it can always be used under any conditions (city/high-speed driving, varying load weight, etc.). The spare wheel is stored under the floor of the luggage area.
CAUTION:
● The pressure should be periodically checked and maintained at the specified pressure
while the tyre is stowed. Driving with an insufficient tyre pressure can lead to
an accident. If you have no choice but to drive with an insufficient tyre pressure,
keep your speed down and inflate the tyre to the correct pressure as soon as possible
(refer to “Tyre inflation pressure” on page 8-13).
● When the tread wear indicators appear, the tyre must be replaced. Refer to ‚ÄúWheel
condition” on page 8-14.
Compact spare wheel*
The compact spare wheel is stored under the floor of the luggage area. It is designed to save space in the luggage area and its light weight makes it easy to handle in the event of a flat tyre.
CAUTION:
● The compact spare wheel is for temporary use only and should be removed as soon
as the original wheel can be repaired or replaced.
● The vehicle must not be driven at speeds in excess of 80 km/h (50 mph) while using
the compact spare wheel.
● The compact spare wheel is not as good as a standard wheel in controllability
and stability. When the compact spare wheel is used, avoid quick starts, sudden
braking and sharp steering.
● The compact spare wheel is specifically designed for your vehicle and it should
not be used on any other vehicle.
● Do not use tyre chain with your compact spare wheel. Because of the smaller tyre
size, a tyre chain will not fit properly. This could cause damage to the wheel and
result in loss of the chain. If a front tyre becomes flat when using tyre chains,
first replace a rear wheel with the compact spare wheel and then use the removed
rear wheel to replace the flat front wheel so that you can continue to use the chains.
CAUTION:
● Upon installation of the compact spare wheel, the ground clearance is reduced
as the tyre is smaller in diameter than the standard tyre. When passing over the
projections on the road, use care not to damage the vehicle’s undercarriage.
● Do not install more than one compact spare wheel at the same time.
To remove the spare wheel
On vehicles with a compact spare wheel

1. Open the tailgate and remove the tyre hanger installation bolt covers (A) with the jack bar. Refer to “Tailgate: To open” on page 1-43.
2. Loosen the tyre hanger installation bolt by turning it anticlockwise with the wheel nut wrench.
CAUTION:
● Be careful as you loosen the tyre hanger installation bolt. If you loosen it too
far, the hook may come out and let the compact spare wheel fall.
3. Raise the lower gate until it locks properly in position with a click. Refer to “Tailgate: To open” on page 1-43.
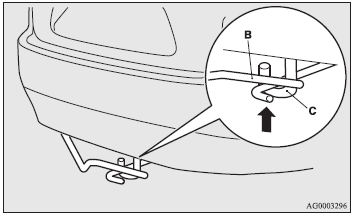
4. Lift up the tyre hanger (B) at the section indicated by the arrow in the diagram, remove it from the hook (C), lower it, and then take the tyre off the tyre hanger.
CAUTION:
● When removing the tyre hanger from the hook or hanging it back on the hook, hold
the tyre hanger carefully so that it does not drop on your feet.
NOTE:
● Put the spare wheel under the vehicle body near the jack. This makes it safer
if the jack slips out of position.
On vehicles with a standard spare wheel
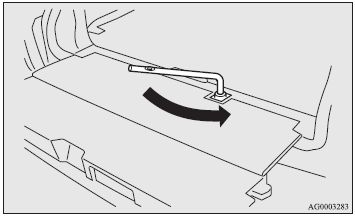
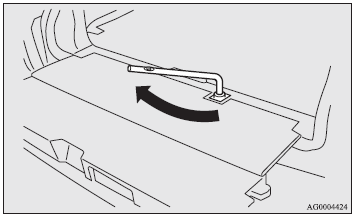
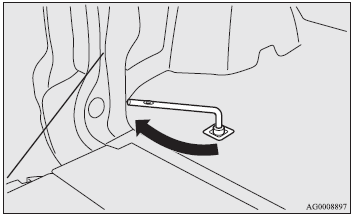
1. Open the tailgate and remove the cover (A) with the jack bar. Refer to “Tailgate: To open” on page 1-43.
2. Insert the wheel nut wrench in the hole and lower the standard spare wheel by turning it anticlockwise.

3. Raise the lower gate until it locks properly in position with a click. Refer to “Tailgate: To open” on page 1-43.
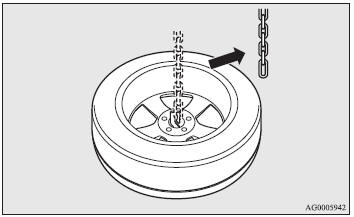
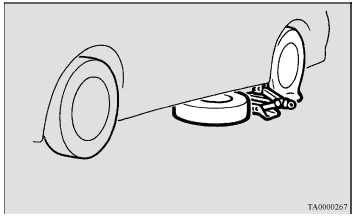
4. Remove the chain from the spare wheel cover.
5. Take out the standard spare wheel from the spare wheel cover.
To store the spare wheel
On vehicles with a compact spare wheel
1. Put the tyre on the centre of the tyre hanger, with the wheel surface facing upwards.
CAUTION:
● Storing the tyre with the wheel surface facing down may damage the wheel or tyre
hanger. If you find any damage on a spare tyre, do not use the tyre and contact
a MITSUBISHI MOTORS Authorised Service Point.
2. Lift up the tyre hanger (A) and hang it on the hook (B).
CAUTION:
● Do not attach the hook to any part of the tyre hanger other than the correct position.
Otherwise the hook could damage the vehicle body, or the tyre could fall while driving
and cause an accident.
3. Open the lower gate. Refer to “Tailgate: To open” on page 1-43. 4. Tighten the tyre hanger installation bolt securely by turning it clockwise with the wheel nut wrench.
CAUTION:
● After storing the spare wheel, check that the tyre hanger is securely locked in
place. If the tyre hanger is not securely locked in place, it could come loose and
fall while you are driving and cause an accident.
● When removing the tyre hanger from the hook or hanging it back on the hook, hold
the tyre hanger carefully so that it does not drop on your feet.
5. Install the tyre hanger installation bolt cover.
On vehicles with a standard spare wheel
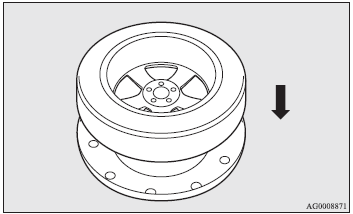
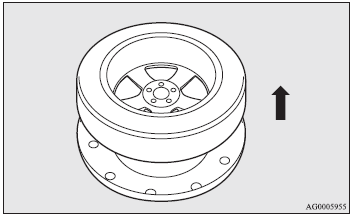
1. Put the tyre on the spare wheel cover with the wheel surface facing downwards.
2. Install the chain on the spare wheel cover.
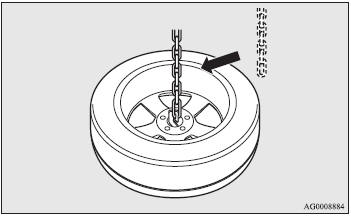
3. Open the lower gate. Refer to “Tailgate: To open” on page 1-43.
4. Turn the wheel nut wrench until the tyre is secure and the chain is tight. Do not over tighten.
CAUTION:
● After storing the spare wheel, check that the spare wheel cover is securely locked
in place. If the spare wheel cover is not securely locked in place, it could come
loose and fall while you are driving and cause an accident.
NOTE:
● Overtightened nut can lead to gear damage, and to become unable to wind up the
chain.
5. Install the cover (A).
To store the tools and jack
Reverse the removing procedure when storing the jack, bar and wheel nut wrench. Refer to “Tools and jack” on page 6-9.
Wheel covers*
To remove
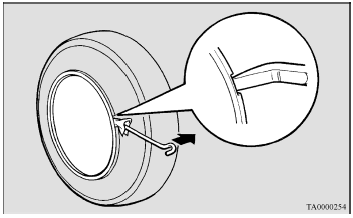
Wrap the tip of the jack bar with a cloth, insert it deeply into the notch provided in the wheel cover, and pry the cover away from the wheel. Using the same procedure at the other wheel cover notches, work the wheel cover away from the wheel to remove it completely.
CAUTION:
● Removing the cover with your hands may cause injury to the fingers.
NOTE:
● The wheel cover is made of plastic. Pry it loose carefully.
To install

1. Make sure the tabs (A) of the back of the wheel cover are not broken and correctly fitted on the rings (B). If in doubt, do not install the wheel cover and consult your MITSUBISHI MOTORS Authorised Servise Point.

2. Align the tyre valve stem (C) with the cut out area (D) in the wheel cover.
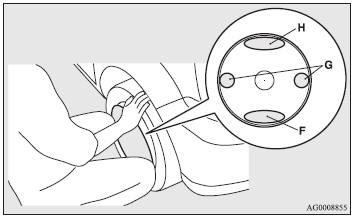
NOTE:
● There is a symbol (E) on the back of the wheel cover indicating the cut out area.
3. Push the underside (F) of the wheel cover into the wheel. 4. Gently push both
sides (G) of the wheel cover and hold it in place with both knees. 5. Gently push
around the top (H) of the wheel cover.
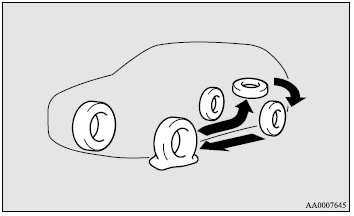
To change a tyre

1. If a wheel cover is installed, first remove the cover (refer to “Wheel covers”). Then loosen the wheel nuts a quarter turn with the wheel nut wrench. Do not remove the wheel nuts yet.
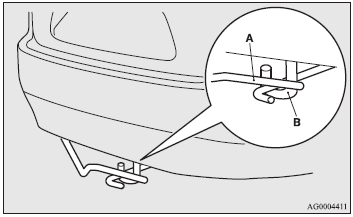
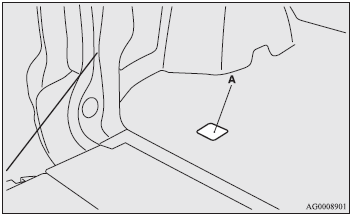
2. Place the jack under one of the jacking points (A) shown in the illustration. Use the jacking point closest to the tyre you wish to change.
WARNING:
● Set the jack only at the positions shown here. If the jack is set at a wrong position,
it could dent your vehicle or the jack might fall over and cause personal injury.
● Do not use the jack on a tilted or soft surface. Otherwise, the jack might slip
and cause personal injury. Always use the jack on a flat, hard surface. Before setting
the jack, make sure there are no sand or pebbles under the jack base.
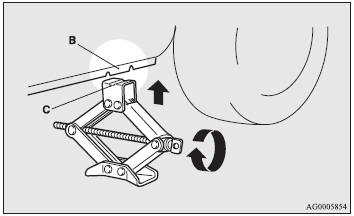
3. Rotate the jack by hand until the flange portion (B) fits in the groove (C) at the top of the jack.
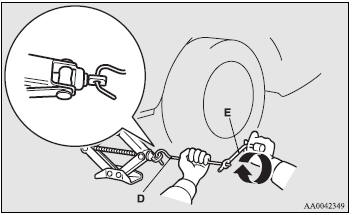
4. Insert the jack bar (D) into the wheel nut wrench (E). Then put the end of the jack bar into the shaft’s jack end, as shown in the illustration. Slowly rotate the wheel nut wrench until the tyre is raised slightly off the ground surface.
WARNING:
● Stop jacking up the vehicle as soon as the tyre is raised off the ground. It is
dangerous to raise the vehicle any higher.
● Do not get under your vehicle while using the jack.
● Do not bump the raised vehicle or leave it sitting on the jack for a long time.
Both are very dangerous.
● Do not use a jack except the one that came with your vehicle.
● The jack should not be used for any purpose other than to change a tyre.
● No one should be in your vehicle when using the jack.
● Do not start or run the engine while your vehicle is on the jack.
● Do not turn the raised wheel. The tyres still on the ground could turn and make
your vehicle fall off the jack.
5. Remove the wheel nuts with the wheel nut wrench, then take the wheel off.
CAUTION:
● Handle the wheel carefully when changing the tyre, to avoid scratching the wheel
surface.
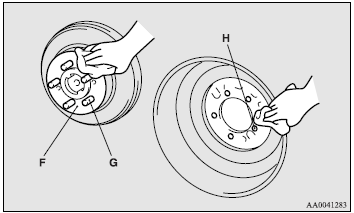
6. Clean out any mud, etc. on the hub surface (F), hub bolts (G) or in the installation holes (H) in the wheel, and then mount the spare tyre.
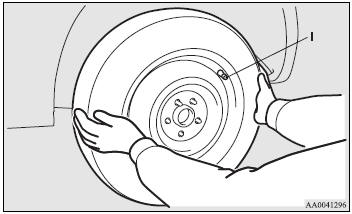
WARNING:
● Be sure to position the tyres the correct way when putting them on the vehicle.
The valves should be on the outer side of the vehicle. If the valve (I) cannot be
seen, the tyre has been mounted the wrong way around. If tyres are mounted the wrong
way around it could have a negative effect on the vehicle and cause an accident.
7. Turn the wheel nuts clockwise by hand to initially tighten them.
[On vehicles with steel wheels]
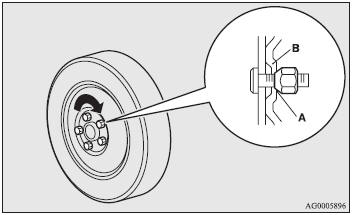
• Normal wheel and compact spare wheels Initially tighten the wheel nuts until the tapered part (A) of the nuts lightly touches the wheel hole seats (B) enough to keep the tyre from wobbling. Initially tighten the nuts in the same way when mounting the compact spare wheel.
[On vehicles with aluminium wheels]
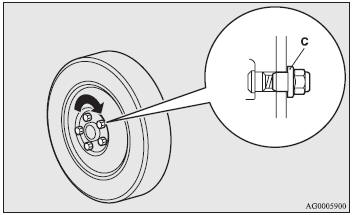
• Normal wheel. For the normal tyres, initially tighten the wheel nuts until the wheel nut flange area (C) touches the wheel enough to keep the tyre from wobbling.
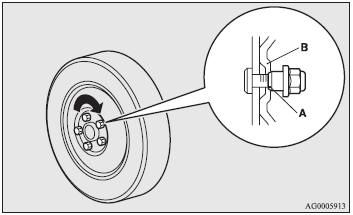
• Compact spare wheel. For compact spare wheels, initially tighten the wheel nuts until the tapered area (A) of the nuts lightly touches the wheel hole seat area (B) enough to keep the tyre from wobbling.
CAUTION:
● Never apply oil to either the wheel bolts or the nuts or they will tighten too
much.
NOTE:
● Flange nuts can be temporarily used on the steel wheel, but return to the original
wheel and tyre as soon as possible.
● If all 4 aluminium wheels are changed to steel wheels. e. g. when fitting winter
tyres, use taperd nuts.
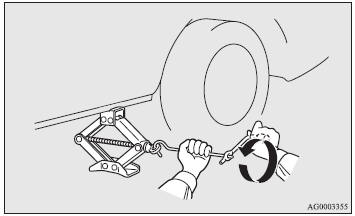
8. Lower the vehicle slowly by rotating the wheel nut wrench anticlockwise until the tyre touches the ground.
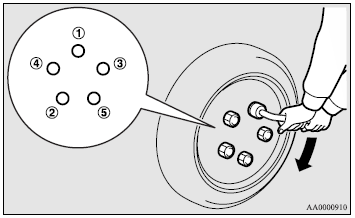
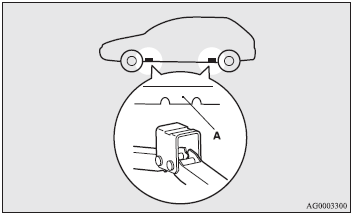
9. Tighten the nuts in the order shown in the illustration until each nut has been tightened to the torque listed here. Tightening torque 88 ~ 108 N•m (Achieved by applying force of 350 to 420N at end of wheel nut wrench supplied with vehicle)
CAUTION:
● Never use your foot or a pipe extension for extra force in the wheel nut wrench.
If you do so, you will tighten the nut too much.
10. If the vehicle has a wheel cover, install it. Refer to “Wheel covers” on page 6-23. 11. Lower and remove the jack, then store the jack, flat tyre, and chocks. Have your damaged tyre repaired as soon as possible. 12. Check your tyre inflation pressure at the next gasstation. The correct tyre pressures are shown on the door label. See the illustration.
CAUTION:
● The compact spare wheel is to be used only temporarily when the standard wheel
is damaged. Repair the damaged tyre as soon as possible and use it to replace the
compact spare tyre.
● After changing the tyre and driving the vehicle about 1000 km (600 miles), retighten
the wheel nuts to make sure that they have not come loose.
● If the steering wheel vibrates when driving after changing the tyre, we recommend
you to have the tyres checked for balance.
● Do not mix one type of tyre with another or use a different size from the one
listed. This would cause early wear and poor handling.
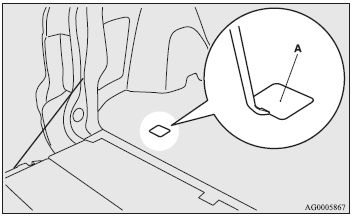
 Tools and jack
Storage
The tools and jack are stowed on the right side of the luggage area. The storage
location of the tools and jack should be remembered in case of an emergency.
1- Jack. 2- Tools.
Tools
...
 Towing
If your vehicle needs to be towed
If you need to tow your vehicle, we recommend that you contact a MITSUBISHI MOTORS
Authorised Service Point or tow truck company. In the following cases, transpo ...
See also:
Traction control (TCS)
Traction control is a driver aid feature that helps your vehicle maintain
traction of the wheels, typically when driving on slippery and/or hilly
road surfaces, by detecting and controlling wheel sp ...
Page (track/folder title) scroll
If you press the “TEXT” button again for at
least 0.5 second, the title will be scrolled
so you can see all of it.
NOTE
- For type A and B audio, the display
is designed to show titles fo ...
Roof antenna
- Be sure to lower the antenna rod
before entering garages, parking
towers and other locations with
low ceilings.
- Remove the antenna rod before
washing your car at a car wash. If
the ...