Honda CR-V: Head Restraints
See page for important safety information and a warning about improperly positioning head restraints.
Your vehicle is equipped with head restraints in all seating positions to help protect you and your passengers from the likelihood of whiplash and other injuries.
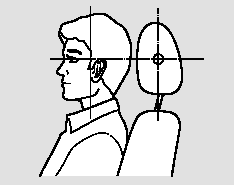
They are most effective when you adjust them so the center of the back of the occupant’s head rests against the center of the restraint.
Adjusting the Head Restraint
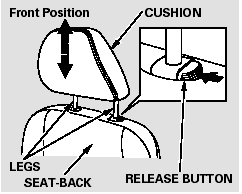
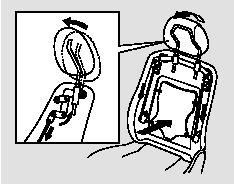
The head restraints adjust for height.
You need both hands to adjust a restraint.Do not attempt to adjust it while driving. To raise it, pull upward.
To lower the restraint, push the release button sideways, and push the restraint down.
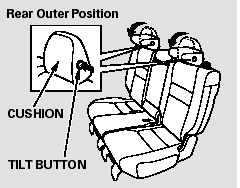
To pivot the outer head restraint down for better visibility, press the tilt button on the side of the head restraint. It folds down forward. To raise the head restraint, pivot it up by hand. Make sure the head restraint locks in position.
Removing the Head Restraint
To remove a head restraint, pull it up as far as it will go. Push the release button, then pull the restraint out of the seat-back.
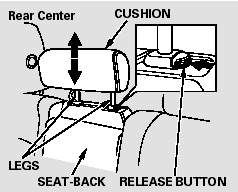
When a passenger is seated in the rear center seating position, make sure the center head restraint is properly adjusted.

Failure to reinstall the head restraints can result in severe injury during a crash.
Always replace the head restraints before driving.
Make sure the removed head restraints are securely stored.
When reinstalling a head restraint, put the legs back in place. Then adjust it to the appropriate height while pressing the release button.
Make sure the head restraint locks in position when you reinstall it.
Active Head Restraints
The driver’s and front passenger’s seats have active head restraints. If the vehicle is struck severely from the rear, the occupant properly secured with the seat belt will be pushed against the seat-back and the head restraint will automatically move forward.
This reduces the distance between the restraint and the occupant’s head.
It also helps protect the occupants against the likelihood of whiplash and injuries to the neck and upper spine.
After a collision, the activated restraint should return to its normal position.
If the restraints do not return to their normal position, or in the event of a severe collision, have the vehicle inspected by a Honda dealer.
For a head restraint system to work properly:
Do not hang any items on the head restraints, or from the restraint legs.
Do not place any object between an occupant and the seat-back.
Install each restraint in its proper location.
Only use genuine Honda replacement head restraints.
READ NEXT:
 Reclining the Front Seats
You can recline the seat-backs on the
front seats so they are level with the
rear seat cushions, making a large
cushioned area. To do this:
EX-L and Canadian EX models
Only the passengerâ€
Folding the Rear Seats Down
Each rear seat-back can be folded
down separately to give more cargo
room. With either of the outer seatbacks
folded-down, you can still
carry a passenger in the rear seat.
With the center se
Folding the Rear Seat Forward
The left and right rear seats can be
folded up separately to make room
for cargo.
To fold the rear seat forward:
Remove any items from the seat
before you fold up the seat cushion.
1. Pul
SEE MORE:
Disc Player Error Messages (LX model)
If you see an error message in the
display while playing a disc, find the
cause in the chart to the right. If you
cannot clear the error message, take
your vehicle to your dealer.
The chart on the right explains the
error messages you may see in the
display while playing a disc.
If you
DTC P2227: BARD Sensor Range/Performance Problem
NOTE:
Before you troubleshoot, record all freeze data and any on-board
snapshot, and review the general troubleshooting information.
If DTC P0101, P0108, P1128, and/or P1129 are stored
at the same time as DTC P2221, troubleshoot those
DTCs first, then recheck for DTC P2221.
1. Turn the ignit
